

For most beginners, a flat plastic palette, a compact stay-wet palette, a small paint organizer, and a well-lit table are all it takes to paint neatly and stop wasting acrylic. An experienced painter has watched enough new painters struggle with dried-out mixes and lost paint pots to know the fix isn’t fancy gear. It’s fifteen minutes of setup before your first stroke, then sessions of 30 to 60 minutes with your paints sealed and ready to pick back up.
TL;DR:
- Using a stay-wet palette can keep acrylic paints usable for days, especially when working on large or detailed paint-by-numbers projects across multiple sessions.
- Organizing your paint pots either sequentially or by color grouping streamlines the painting process and reduces time spent searching for the right color.
- Starting with light or midtone colors before progressing to darker shades helps minimize touch-ups and ensures cleaner coverage on your canvas.
- Proper setup, including adjustable lighting and a clutter-free workspace with protective covers, enhances focus and reduces common beginner mistakes.
- Using brushes appropriately by size and technique, along with careful loading and cleaning, results in cleaner lines and longer-lasting brushes.
Table of Contents
- Workspace Essentials: What Do You Need Before You Start?
- Which Palette Type Actually Works Best for Paint by Numbers?
- How Do You Arrange and Label a Paint-by-Numbers Palette?
- Should You Paint Light to Dark or Dark to Light?
- How Do You Keep Acrylic Paint Usable Between Sessions?
- How Do You Load and Handle Your Brushes for Clean Lines?
- Paula S.'s Quick Checklist Before Your First Stroke
- Why a Tidy Palette Changes How the Whole Session Feels
- Set Up Once, Paint for Years With the Right Tools
- Sources
- FAQ
Workspace Essentials: What Do You Need Before You Start?
Your table height matters more than most beginners realize. Sit so your forearm rests flat with your elbow bent around 90 degrees. If your chair is too low, you’ll hunch over the canvas and your lines get shaky within twenty minutes.
Light comes next, and it’s the setup step people skip most often. Natural daylight from a window works, but an adjustable desk lamp with a neutral white bulb is more reliable, especially once the sun moves or you’re painting after dinner. Position it so it shines across the canvas at an angle rather than straight down, which cuts glare off wet paint and helps you actually see the number printed under your brushstroke.
Before you open a single paint pot, cover your table. A cheap vinyl mat or even a folded towel protects the surface from drips, and a non-slip mat underneath your canvas keeps it from sliding while you work on detail sections.
Arrange your station so everything has a lane:
- Canvas centered and taped flat, reference image propped just above it
- Palette to your dominant hand’s side, within easy reach without stretching
- Water cup and a folded paper towel between the palette and canvas
- Brush rest or a spare cup to keep wet brushes off the table
- Small trash container or extra paper towel pad for quick wipe-ups
Wipe spills the moment they happen. Acrylic that dries on wood or fabric is far harder to remove than acrylic you catch in the first sixty seconds.
Pro Tip: Tape a paper towel strip directly to your table edge near the palette. It turns “wipe and tap” brush cleaning into a one-motion habit instead of a reach-and-search.
Which Palette Type Actually Works Best for Paint by Numbers?
Palette choice shapes how much paint you waste and how long a session can run before colors dry out. The right pick depends less on budget and more on how long you sit down each time.
Flat plastic palettes are the default for a reason. They’re light, they cost little, and they wipe clean with water while the paint is still wet. Most paint-by-numbers kits pair naturally with one, because you’re working with small dabs of acrylic rather than full tubes.
Glass palettes give you a smoother mixing surface and they don’t stain, but they’re heavier, breakable, and honestly overkill for most casual painters. Professional painters like them because glass cleans up with a razor blade after paint fully dries. For a weekend hobbyist, that’s a lot of durability you’re paying for and not using.
Disposable palette paper is the low-commitment option. Tear off a sheet, paint, toss it when you’re done. Great for a single sitting, terrible if you want to save a custom mix for tomorrow.
Stay-wet palettes solve the problem all three of the above share: dried paint. They work with a damp sponge underneath a permeable membrane paper, and that moisture wicks up into your paint, keeping it workable for hours instead of minutes. According to Golden Artist Colors, sealing the lid on a stay-wet system can keep acrylics usable for days rather than just one sitting. The Masterson STA-Wet Premier Palette is a well-known commercial version, shipping with palette paper, a sponge, tray, and lid built for exactly this.
Here’s how to decide between them:
- Painting for under an hour, one sitting only: flat plastic or disposable paper
- Working across multiple evenings on the same kit: a stay-wet system
- Tackling a detail-heavy or mini kit with lots of small color blocks: stay-wet, since it cuts down on remixing the same shade twice
- Traveling or painting outside your usual spot: a thumb-hold plastic palette for portability
Beginner palette comparisons consistently rank plastic and disposable options as the easiest entry point, with glass and stay-wet systems positioned as upgrades once you know your habits. If you paint in short bursts most weeks, don’t buy the stay-wet system yet. If you’re the type who sits down three nights running on the same landscape kit, it pays for itself fast.
How Do You Arrange and Label a Paint-by-Numbers Palette?
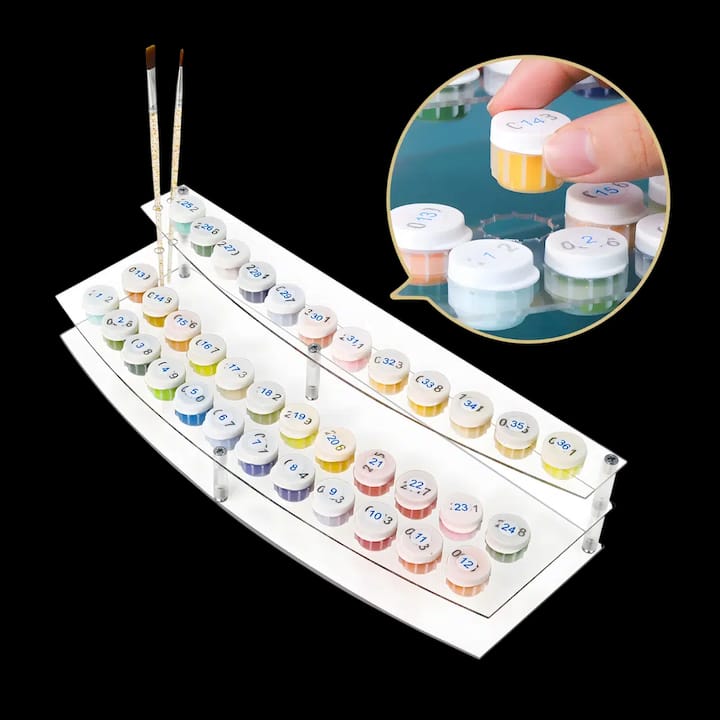
A paint-by-numbers kit hands you a built-in organizing system: the numbers themselves. The mistake beginners make is ignoring that system and dumping pots onto the palette in random order.
Pick one of two layouts and stick with it for the whole canvas:
- Sequential layout. Arrange your numbered pots left to right or top to bottom, matching the order they appear on your reference chart. This works well for kits with 20 colors or fewer.
- Functional grouping. Cluster colors by warmth or value instead, warm tones on one side, cool tones on the other, darkest to lightest within each cluster. This scales better for kits with 40+ colors, where a strict sequence gets hard to scan quickly.
Whichever you choose, a paint organizer stand keeps pots upright and visible instead of rolling around your table, which shaves real time off every color hunt. Snap a phone photo of your layout before you start painting. If a pot tips over or a label rubs off, you have a reference to rebuild it in seconds instead of guessing.
Two tactical habits save paint and frustration:
- For large blocks sharing one number, mix a slightly bigger batch on your palette up front rather than reloading your brush six separate times.
- For tiny detail areas, keep a second small dab of that color fresh and set aside, so your detail brush never touches a puddle that’s already skinning over.
A clear layout like this mirrors what Will Kemp Art School recommends for general acrylic work: keep your most-used colors within easy reach of the canvas and leave dedicated space for mixing, rather than mixing on top of your pure color reserves.
Should You Paint Light to Dark or Dark to Light?
Most hobbyists find light-to-dark easier to start with, mainly because light paint often doesn’t fully cover a dark printed number underneath. Painting dark areas first and light areas after tends to mean more touch-ups.
That said, plenty of experienced painters work dark to light for shading and depth, especially on portraits or landscapes with strong shadow. A Reddit thread of paint-by-numbers advice shows the hobby community is genuinely split on this, and the honest answer is that either order works once you know your kit’s paint coverage.
For your first canvas, start with midtones or light colors, then move toward darker, more saturated areas last. This order gives you the most flexibility if the first coat doesn’t fully cover.
A few habits keep your mixes clean regardless of order:
- Mix in small batches, enough for one number’s worth of coverage, not the whole canvas
- Test coverage on a spare corner of your kit’s extra canvas or a scrap of palette paper before committing to the actual section
- Rinse your brush fully between distinct colors, especially before crossing from a warm tone to its complementary cool tone, since those mixes turn muddy fastest
- Wipe the ferrule (the metal part holding the bristles) if paint creeps up into it, or you’ll drag old color into your next mix
Pro Tip: Save your highlights and fine detail work for after the surrounding block color has dried for a few minutes. Painting detail into wet base color blurs the edge you worked so hard to keep clean.
How Do You Keep Acrylic Paint Usable Between Sessions?
Paint-by-numbers kits rarely get finished in one sitting, so keeping your mixes alive between sessions matters as much as mixing them well in the first place.
A sealed stay-wet palette is the simplest fix: close the lid, and your paint stays workable for your next session instead of turning into a crust. If you’re using a flat plastic palette without a lid, cover it tightly with plastic wrap pressed down onto the paint surface to block air.
A few storage habits worth building into your routine:
- Press pot lids fully closed and wipe rims before sealing, since dried paint on the rim breaks the seal
- Transfer any mixed custom color you want to keep into a small airtight container rather than leaving it exposed on the palette
- Replace stay-wet sponge and palette paper every few weeks, or sooner if you notice a musty smell, since a damp sponge left too long can grow mold
- Skip the fridge. Refrigerating acrylic paint risks condensation forming inside the pot once it warms back up, which throws off your color and consistency far more than it helps
How Do You Load and Handle Your Brushes for Clean Lines?
Brush choice inside a typical kit breaks into three rough jobs. Small round brushes handle detail and tight numbered sections. Small flat brushes give you the cleanest straight edges along borders between colors. Larger flat brushes cover big blocks of a single number fast.
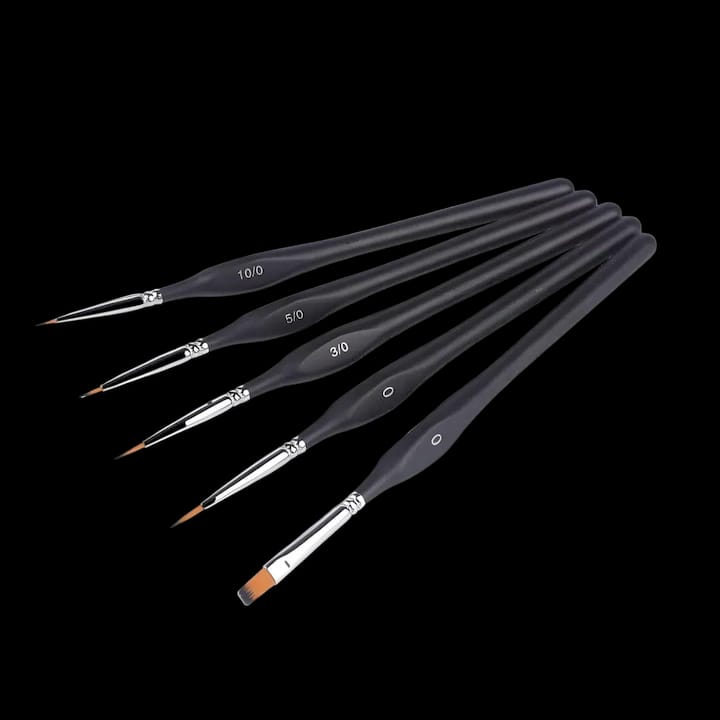
Load your brush by dipping just the tip into your paint mix, then dragging it once across a clean spot on your palette to test the amount before it touches canvas. Overloading is the single most common beginner mistake. A brush carrying too much paint blurs edges and pools in corners instead of laying down a controlled, even coat.
Between colors, wipe your brush against a paper towel and tap it once to release excess before rinsing. A quick rinse and a second wipe on a dry towel keeps bristles from splaying, which extends the life of even basic detail brushes considerably.
If your paint feels thick and drags rather than glides, a tiny drop of water thinned into the mix on your palette, not straight into the pot, smooths coverage without weakening the color.
- Rounds: fine detail, small numbered dots, tight corners
- Small flats: clean straight or curved borders between adjacent colors
- Larger flats: quick coverage across big single-number blocks
Pro Tip: Keep one brush dedicated to your lightest colors only. Cross-contamination from a brush that just held dark brown is the most common reason light colors turn slightly gray.
Paula S.'s Quick Checklist Before Your First Stroke
This checklist was built from the setup mistakes most often seen in new painters, and it holds up across nearly every kit size.
- Table cleared, lamp angled across the canvas, chair at forearm height
- Palette loaded and labeled to match your reference chart before opening more than two pots at once
- Mixing zone kept separate from your pure color reserves
- Lid or wrap ready to seal the palette the moment you pause
- Paper towel and water cup within arm’s reach, no stretching required
Three fixes for the problems that come up constantly: if the printed number shows through a light color, add a second thin coat once the first dries rather than one thick coat. If paint dries too fast on your palette, you likely need a stay-wet system or you’re working in a room that’s too warm and dry. If a mixed color doesn’t match your reference swatch, check it against the swatch in daylight, not lamp light, since warm bulbs shift how color reads.
Why a Tidy Palette Changes How the Whole Session Feels
The difference between a chaotic table and an organized one isn’t cosmetic. Every second you spend hunting for pot number 14 is a second your brush sits loaded and drying. Once fixed palette layouts were recommended to new painters, the most common feedback was simply that sessions felt calmer, less like problem-solving and more like painting.
Try one 30 to 45 minute session with your palette set up before you sit down, not while you’re already holding a brush. See if the difference is real for you.
— Paula S.
Set Up Once, Paint for Years With the Right Tools
A tidy palette setup only holds up as long as your gear does, and this is where the right tools pay for themselves fast. Some accessories are designed around exactly the workflow covered above, so you’re not improvising with kitchen supplies.

The Paint Organizer Stand is the starter fix for anyone whose numbered pots keep tipping over or rolling off the table. It’s the single upgrade that pays off fastest for kits with more than 20 colors. For edge work and blending, the Premium Paint Brushes set of 10 covers the round, flat, and detail sizes this article walks through, all in one pack. If you paint often enough that bristles start splaying within a few kits, the Professional Brushes line holds its tip longer and gives you finer control on detail-heavy canvases.
All three pair naturally with any kit in the Paint by Numbers collection, including landscape, animal, floral, travel poster, and famous painting designs, or a custom kit made from your own photo. Pick the organizer and brush set that match your next canvas, and set your palette up once before you start.
Sources
For deeper mechanics on stay-wet systems, see Golden Artist Colors’ guidance on paint waste and the Masterson STA-Wet Premier Palette product details. For layout principles, Will Kemp Art School’s palette tutorial and Craftybynumbers’s own paint color guidance cover setup from two angles.
- Golden Artist Colors — resources on disposing of painting wastes
- How to Layout an Acrylic Paint Palette | Will Kemp Art School
- 20 Best Palettes for Acrylic Paint For Beginners | Acrylic Painting School
FAQ
In What Order Should I Paint a Paint-by-Numbers Canvas?
There’s no single required order, but most beginners find it easier to paint lighter and midtone colors first, then move to darker, more saturated areas last. This reduces the touch-ups needed when a light color doesn’t fully cover the printed number underneath.
What Is the 70/30 Rule in Painting?
Definitions of this rule vary depending on the source and medium, and it isn’t a standard paint-by-numbers concept. If you’ve seen it referenced, treat it as informal advice rather than a fixed rule, and focus instead on consistent layout and mixing habits covered above.
What Is the Best Strategy for Paint by Numbers?
Set a consistent palette layout, work in small mixed batches, and seal your palette between sessions so paint doesn’t dry out. A paint organizer stand and a stay-wet palette handle most of the friction beginners run into.
How Do I Set Up a Palette for Paint by Numbers?
Start with a flat plastic or stay-wet palette, arrange your numbered pots in a sequential or grouped layout that matches your reference chart, and keep a separate mixing zone. Add good lighting and a wipe-clean surface, and you have a complete palette setup for paint by numbers ready before your first stroke.
0 commentaire