

You can be painting in under five minutes with a clear 18 to 24 inch surface, a 5000K task light angled 45 degrees over it, a small palette, a water jar, and something wipeable underneath. Everything else, from vertical racks to a rolling cart, just makes that minimum setup faster to deploy and easier to put away. Get those five elements right first, then build out the rest of your workspace setup for painting around them.
TL;DR:
- Use a task light with 5000K to 6500K color temperature and high CRI placed 14 to 18 inches at a 45-degree angle for true color accuracy.
- Keep your primary working surface between 18 and 24 inches wide with a wipeable finish, and organize paints and tools into zones within reach to minimize movement.
- Ensure proper ventilation with open windows and fans for water-based media, and utilize extraction or respirators for oil paints and solvents.
- Group art supplies by medium, color, and usage frequency before choosing storage containers, with specific options like wall racks, rolling carts, or labeled drawers.
- Maintain a workspace temperature between 65 and 75 degrees Fahrenheit with moderate humidity, and manage outlets to avoid overloads and fire hazards.
Table of Contents
- What Do You Actually Need in a Painting Workspace?
- How Should You Zone Your Painting Area?
- Where Should Paints, Brushes, and Tools Live?
- What Ergonomics and Tools Actually Matter?
- Three Small-Space Layouts You Can Copy Today
- What’s the Fastest Way to Prep and Reset Your Space?
- Temperature and Humidity: The Variable Everyone Forgets
- Do You Need to Think About Outlets and Power?
- Can You Paint Without Disrupting the Rest of the House?
- Why Setup Friction Kills More Painting Habits Than Skill Ever Does
- Speed Up Setup With the Right Kit
- Sources
- FAQ
What Do You Actually Need in a Painting Workspace?
A painting workspace lives or dies on four things: light, surface, air, and protection. Skip any one of them and you’ll either ruin colors, damage furniture, or cut sessions short because the room starts to smell like a hardware store.
Lighting is where most home setups go wrong. A 5000K task light placed 14 to 18 inches above your work surface at roughly 45 degrees avoids glare while keeping colors true. Anything warmer than 4000K shifts your whites yellow; anything much cooler than 6500K starts to feel clinical and washes out subtle mixes. Color rendering index matters more than raw brightness here. A cheap bulb with a high CRI, 90 or above, will show you truer color than an expensive one with poor CRI, according to guidance on beginner art space setups. North-facing window light works too, but it changes through the day, so a lamp gives you consistency a window never will.
Surface needs are more forgiving. A minimum viable painting corner runs 18 to 24 inches wide for casual work, expanding to a wider dedicated surface once painting becomes a regular habit. What matters more than size is that the surface wipes clean. Laminate, sealed wood, or a plastic mat over anything else all work.
Ventilation depends entirely on medium. If you’re working in acrylics or watercolor, a cracked window and a standing fan handle it fine. Oils, solvents, and spray varnish are a different story. Mineral spirits and turpentine fumes build up fast in a closed room, and that’s when you need real cross ventilation or a small extraction fan pointed out a window, plus a respirator rated for organic vapors if you’re using solvents regularly.
Protection is the cheapest fix in this whole list. Tape a plastic tablecloth to your desk corners, lay a drop cloth or old shower curtain under your chair, and prop a flattened cardboard box behind your easel to catch stray splatter, a trick pulled straight from acrylic workspace setup guides.
- Task light: 5000K to 6500K, 90+ CRI, 14 to 18 inches above the surface
- Surface: 18 to 24 inches minimum, wipeable finish
- Ventilation: open window plus fan for water-based media; extraction and respirator for solvents
- Protection: taped plastic sheet, drop cloth, cardboard backboard
Pro Tip: Buy the lamp before you buy the easel. Bad light ruins more paintings than bad brushes ever will.
How Should You Zone Your Painting Area?
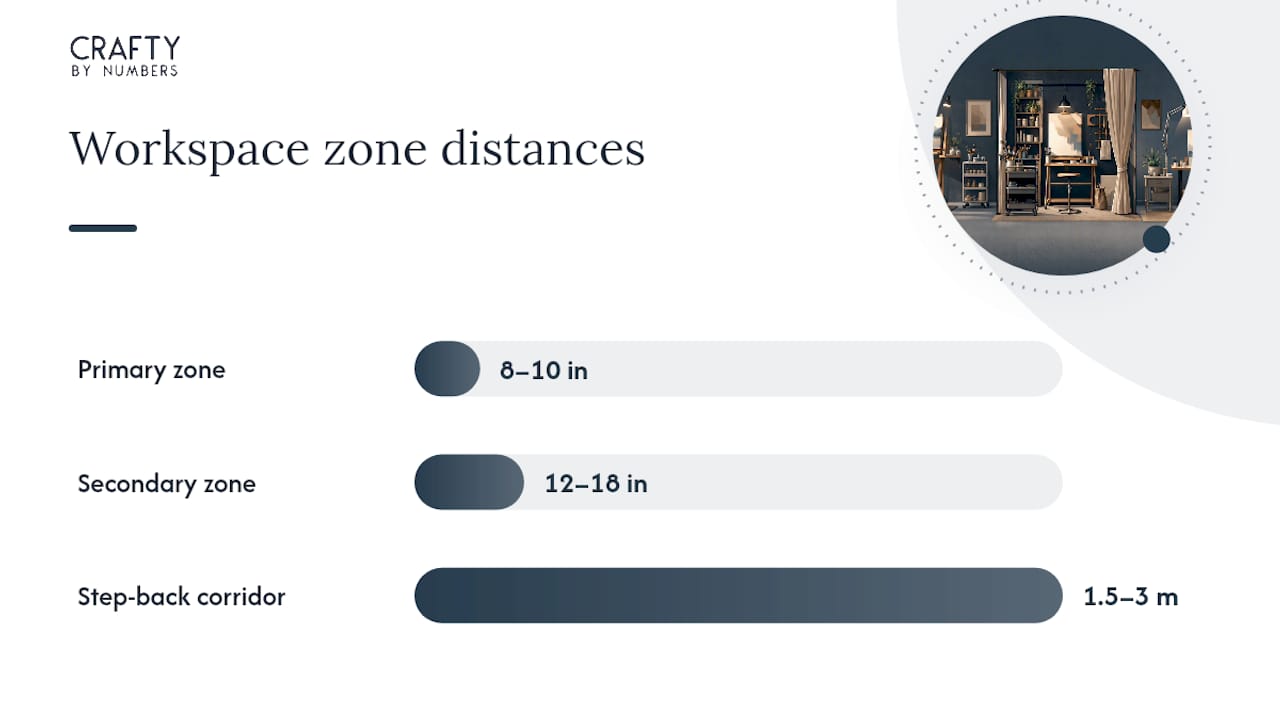
Split your area into three zones by distance, and most of the friction in a painting session disappears. Designers and hobby resources generally recommend a primary zone 8 to 10 inches in front of you, holding only what you’re using right now: your active palette, one or two brushes, the water jar. A secondary zone at 12 to 18 inches to your dominant side holds paints and tools you’ll reach for often but aren’t touching every minute, your full brush set, tube paints, a rag.
Everything else, reference photos you’re not using today, backup canvases, old palettes, belongs in an archive zone, wherever you have space, even a closet shelf across the room.
The piece people skip is step-back distance. Professional studio setups plan for a 1.5 to 3 meter corridor so you can actually judge your composition from a distance. In a small room, you won’t have that. Use a mirror angled behind you, or just snap a photo on your phone and check it at arm’s length. It does the same job.
- Desk corner: primary zone on the desk surface, secondary zone in a drawer directly below.
- Small flat: primary zone on a lap tray, secondary zone in a rolling cart parked beside the chair.
- Hobby desk shared with other work: primary zone on a removable tray, secondary zone in a single labeled bin that lives under the desk between sessions.
Pro Tip: If you keep reaching past your primary zone mid-stroke, your layout is wrong, not your memory. Move the item, not yourself.
Where Should Paints, Brushes, and Tools Live?
Buy the storage after you know what you own, not before. Start by grouping every supply you have into three passes: sort by medium first (acrylics with acrylics, watercolors with watercolors), then by color within each medium, then by how often you actually reach for it. This three-step audit stops you from buying a cart that just relocates your clutter instead of solving it. Storage guidance from The Spruce makes the same point: picking containers before auditing what you own is the single most common beginner mistake.
Once you’ve sorted, match the container to the category.
- Wall racks or pegboard: great for brushes and frequently used tubes, but only if your wall is actually free and you’re not renting somewhere with strict no-holes rules.
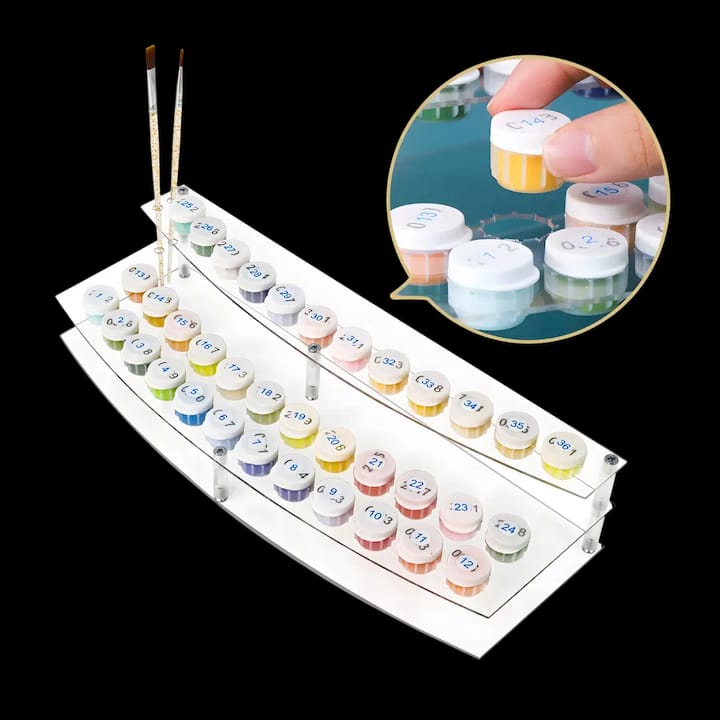
- Modular tiered racks: hold a lot in a narrow footprint, ideal against a wall next to a desk.
- Rolling cart: the best option for shared rooms because the whole kit tucks away between sessions.
- Jars and clear bins: perfect for pigments, mediums, and small tools you want visible at a glance.
- Labeled drawers: best for archive-zone items you touch once a month.
For brushes specifically, a roll-style organizer keeps bristles from bending in transit and works whether you’re storing three brushes or thirty. A paint organizer stand does the same job for tubes and bottles, standing them upright so labels face out instead of getting lost at the bottom of a bin.
Pro Tip: Keep your ten most-used items visible at all times. Everything else can live in a drawer, but those ten need to be grabbable without thinking.
What Ergonomics and Tools Actually Matter?
Desk height and elbow angle decide whether a two-hour session leaves you loose or aching. Aim for a work surface between 28 and 32 inches high, low enough that your elbow sits close to a 90-degree angle when your brush touches the canvas. Too high and your shoulder carries the strain; too low and you’ll hunch within twenty minutes.
Easel angle matters almost as much. A 15 to 30 degree tilt reduces glare from overhead light and keeps you from leaning forward to check detail. No easel? Prop a board against a stack of books at one end, or use a laptop stand under the back edge of a tray. Either gets you close enough.
Layout follows your dominant hand. Brushes and palette sit on that side, water jar just beyond them, so a wet brush never crosses over your painting.
| Item | Use case | Notes |
|---|---|---|
| Round brushes (sizes 2, 10) | Detail and fill work | Start with three, add more once you know your gaps |
| Flat brush (1 inch) | Backgrounds and large areas | Speeds up base coats significantly |
| Plastic or ceramic palette | Mixing | Ceramic wipes cleaner, plastic is lighter for a cart |
| Water jar with lid | Rinsing and thinning | Lid matters if you’re transporting a cart between rooms |
| Paper towel roll | Blotting and cleanup | Keep it in the primary zone, not the drawer |
- Desk height: 28 to 32 inches
- Easel tilt: 15 to 30 degrees
- Elbow angle target: 90 degrees when brush meets surface
A wooden painting easel earns its keep once you’re working larger than tabletop size or holding multiple canvases across a project.
Three Small-Space Layouts You Can Copy Today
Layout A: The desk-corner kit. Footprint of 18 by 24 inches on an existing desk. Park a small rolling cart beside your chair for secondary-zone supplies, clip your task lamp to the desk edge at 45 degrees, and you’re set up in under two minutes.
Layout B: The portable paint station. Everything, palette, brushes, small paints, water jar with a tight lid, lives in one storage box. Deploying it takes two to three minutes: unfold a lap tray, unpack the box onto it, done. Breakdown is the same in reverse. This is the layout for anyone sharing a living room with three other people.
Layout C: The family-room compromise. Use a lidded bin that locks, keep solvents and anything sharp in the archive zone out of reach, and cover your working surface with a taped plastic sheet before every session so cleanup is a thirty-second wipe rather than a scrub.
- Pick the layout that matches your room, not the one that looks nicest online.
- Set it up once, fully, before your first real painting session, so you catch problems while nothing’s wet.
- Time yourself on breakdown. If it takes longer than five minutes, simplify your storage, not your painting.
- Desk-corner kit: best for solo rooms with a spare desk
- Portable station: best for shared spaces and renters
- Family-room compromise: best for households with kids or pets nearby
Small apartment dwellers looking for more general space-saving furniture ideas may find crossover inspiration in setups built for compact home offices, since the same tiered-storage logic applies to painting corners.
What’s the Fastest Way to Prep and Reset Your Space?
A five-minute setup and five-minute reset is what keeps painting a habit instead of a production. Setup means: pull your kit out, check your palette is clean, fill the water jar, position the lamp. Reset means: move wet work to a drying rack or flat shelf, wipe the surface, cap paints, and sort trash before it dries into the bin.
- Rinse brushes in soap and water immediately, using an old toothbrush to work paint out of the ferrule where bristles meet handle.
- Dry brushes bristle-up or flat, never bristle-down in a jar, or they’ll warp.
- Sort waste before you toss it: dry acrylic scraps go in regular trash, but solvent-soaked rags need to be sealed in a metal container or soaked flat to dry outdoors, since they can combust if bunched up wet.
- Store half-used paint palettes by covering them with plastic wrap and a lid, then refrigerating acrylics if you won’t return within a day.
Check a dedicated storage guide if you’re juggling several open tubes across projects.
Temperature and Humidity: The Variable Everyone Forgets
Most home painters obsess over light and ignore climate, and that’s a mistake. Acrylics dry fastest and most evenly between 65 and 75 degrees Fahrenheit with moderate humidity, roughly 40 to 60 percent. Push much above that range and paint skins over on the palette before you can use it. Drop below it, especially in a cold garage or unheated spare room, and drying slows to a crawl, which invites dust and stray hairs to settle into wet paint.
Humidity swings hit oils differently. High humidity slows solvent evaporation, extending your working time but also extending the wait before you can safely varnish. Very low humidity, common in winter with the heat running, can make acrylic paint dry so fast on the palette that you’re re-wetting it every few minutes instead of painting.
A small hygrometer, the kind sold for wine cellars or humidor kits, costs little and tells you exactly what your room is doing. If you’re consistently outside the comfortable range, a portable space heater or a basic dehumidifier fixes it faster than trying to relocate your entire setup to a different room. Watercolor painters need the opposite watch: too dry, and washes evaporate unevenly, leaving hard edges you didn’t intend.
Keep your workspace away from direct vents, radiators, or drafty windows if you can. Uneven airflow across a wet canvas dries one side faster than the other, and that shows up as visible lines once the piece is finished.
Do You Need to Think About Outlets and Power?
A task lamp, a phone charger for reference photos, maybe a small fan for ventilation. That’s three plugs before you’ve picked up a brush, and most desk corners weren’t built with painting in mind.
Run a power strip with surge protection along the back edge of your desk rather than daisy-chaining extension cords across the floor, where a stray foot or a curious pet can pull a lamp down into wet paint. If your setup includes anything with a heating element, a hot glue gun for mixed media, a small space heater for winter sessions, keep it on its own outlet rather than sharing a strip loaded with other devices.
Cord management matters more in a painting space than almost any other hobby setup, because you’re working with liquid nearby. Route cords along the wall with adhesive clips instead of letting them run across your primary or secondary zone. A cord underfoot near a full water jar is how you lose an afternoon’s work and a laptop in the same accident.
If you’re setting up in a converted closet or an unused nook, check the outlet count before you commit to the space. Retrofitting one outlet into two or three later is a bigger project than most people expect, and a single overloaded outlet running a lamp, a fan, and a phone charger simultaneously is a fire risk worth taking seriously.
Can You Paint Without Disrupting the Rest of the House?
Painting itself is silent, but everything around it usually isn’t. A rattling window fan for ventilation, a phone propped up playing a tutorial, a household with a TV on in the next room, any of these can break the concentration painting actually requires.
If ventilation noise is the issue, a small oscillating fan set to low usually moves enough air for acrylics without the drone of a box fan on high. For solvent-heavy oil work where you genuinely need stronger airflow, running the fan for short bursts between painting stretches, rather than continuously, cuts the noise exposure while still clearing fumes.
For everything else, a pair of basic noise-isolating earbuds or over-ear headphones solves more of this than any workspace redesign will. Playing low, steady background sound, instrumental music or ambient tracks with no lyrics, tends to help sustained focus better than silence, which in a shared home is rarely silent anyway.
Physical placement helps too. A desk corner facing away from a hallway or a shared living space cuts down on visual interruption even when you can’t control the noise itself. If your painting area sits inside a busier room, a simple room divider or even a bookshelf angled to block sightlines does more for concentration than it looks like it should.
Why Setup Friction Kills More Painting Habits Than Skill Ever Does
Most advice about painting workspaces focuses on the wrong problem. People search for the perfect easel or the ideal lamp brand when the real barrier is almost always time to first brushstroke. If unpacking your kit takes twenty minutes, you’ll paint once a month. If it takes five, you’ll paint every week without noticing you made a decision to do it.
That’s the case for a semi-permanent setup, one where the palette, water jar, and primary tools stay assembled and ready rather than packed away after every session. It costs you a little counter space. It buys back the twenty minutes of friction that quietly kills more hobbies than bad technique ever does.
The conventional wisdom oversells expensive gear and undersells proximity. A cheap lamp at the right distance beats a premium one shoved in a corner. A drawer six inches from your chair beats a beautiful cart across the room. Prioritize what’s closest and fastest to reach before you spend on anything else, and the rest of your workspace setup for painting will fall into place with far less trial and error than most guides suggest.
— Paula S.
Speed Up Setup With the Right Kit
Paint-by-numbers kits are designed for repeatable sessions where you don’t want to rebuild your workspace from scratch every time. If you’re working through a multi-session kit, a paint organizer stand keeps your numbered paint pots upright and labeled so you’re not hunting for color 14 halfway through a canvas. It’s the right pick for a desk-corner or family-room layout where counter space is tight and paints need to stay visible, not buried in a drawer.
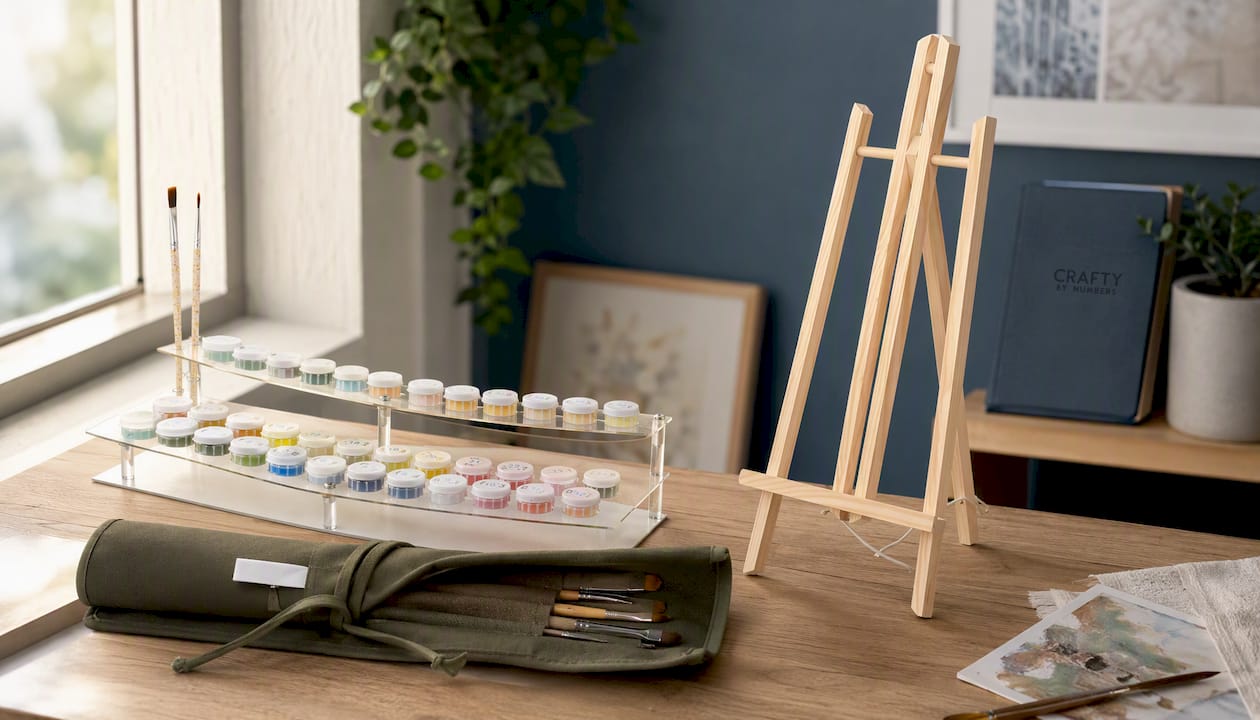
For anyone rotating brushes between sessions, an artist brush roll organizer protects bristles in transit and rolls flat into a drawer or bag between sittings, which matters if your kit needs to disappear between painting nights. And if your project has moved past tabletop scale, a wooden painting easel gives you the tilt and stability a propped board can’t match once detail work gets demanding. Browse the current kit lineup at Craftybynumbers and match a kit to whichever layout fits your space.
Sources
- How to Set Up Your Workspace for Acrylic Painting
- Painting Workspace Setup Guide | PROSCALE
- 10 clever ways to organize your art supplies
- How to organize art supplies
FAQ
What Is the 70/30 Rule in Painting?
There’s no single agreed-upon ratio rule in painting technique; the term shows up informally in different contexts, from color balance to composition, so treat any specific definition you find with caution rather than as a fixed standard.
What Is the 80/20 Rule in Painting?
Similarly, the rule about spending most of your time on broad shapes and values before detail work isn’t a formal painting principle with one accepted definition; it’s used loosely and not standardized guidance.
What Is the Best Desk for Painting?
The best desk is one that’s wipeable, sits between 28 and 32 inches high, and gives you at least 18 to 24 inches of usable surface. Beyond that, a dedicated art desk with wall storage helps once painting becomes a regular habit rather than an occasional session.
How Much Space Do I Need for a Painting Workspace Setup?
You can start painting comfortably in an 18 to 24 inch desk corner. As practice grows, most hobbyists expand toward a 30 to 48 inch dedicated surface with nearby storage.
How Do I Keep My Painting Area Ventilated Safely?
For acrylics and watercolors, an open window plus a fan usually clears fumes adequately. For solvents and oil mediums, use active cross ventilation or an extraction fan, and wear a respirator rated for organic vapors during heavy solvent use.
0 Kommentare