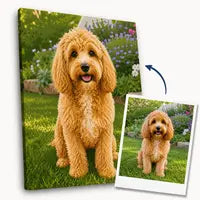


Painting dogs is defined as any creative project where dogs serve as the subject of a portrait or actively participate in making art. Pet owners have three distinct approaches to choose from: paw-print keepsakes, realistic acrylic portraits, and interactive abstract art made by the dog itself. Each method requires different materials, different levels of skill, and a different relationship between artist and pet. The right starting point depends on what you want to hang on your wall and how much your dog will tolerate.
What materials and paints are safe for dog painting projects?
The safest paints for dog-related art are washable acrylics, tempera, watercolors, and milk paint. All four are water-based, which means cleanup is fast and the risk of skin irritation stays low. Solvent-based paints, oil paints with heavy metal pigments, and any product with added fragrances are off the table when a dog’s paws or nose will be anywhere near the canvas.
When buying paint for paw-print work, look for the ACMI AP non-toxic seal on the label. The Art and Creative Materials Institute issues this certification to products that meet strict safety standards for human and animal contact. A certified label does not guarantee zero risk, but it eliminates the most dangerous chemical categories.
Pet-safe ink pads designed specifically for animals are the gold standard for paw-print art. They transfer cleanly, dry fast, and require almost no cleanup. Paint-soaked sponges are a workable second choice, but they leave more residue on the paw and increase the chance of licking.
Pro Tip: Buy a second set of cheap brushes and a dedicated plastic palette for any session involving your dog. Keeping pet-contact supplies separate from your regular art tools prevents cross-contamination with any paints that are not pet-certified.
Recommended supplies at a glance
| Supply | Best use | What to avoid |
|---|---|---|
| ACMI-certified washable acrylic | Portraits, backgrounds | Solvent-based or oil-based formulas |
| Pet-safe ink pad | Paw prints | Dye-based stamp pads for office use |
| Watercolor pan set | Light washes, backgrounds | Tube watercolors with cadmium pigments |
| Tempera paint | Kids’ paw-print projects | Permanent or enamel formulas |
| Soft foam sponge | Paw-print transfers | Bristle brushes that hold excess paint |
How do you create dog paw-print art safely?
Paw-print art is the fastest way to get a dog involved in a creative project. The press-and-lift technique keeps sessions short and mess contained. You press the paw onto the ink pad or paint sponge, transfer it to paper or canvas with one firm press, then lift straight up without sliding. Sliding smears the print and ruins the detail.
Follow these steps for a clean result every time:
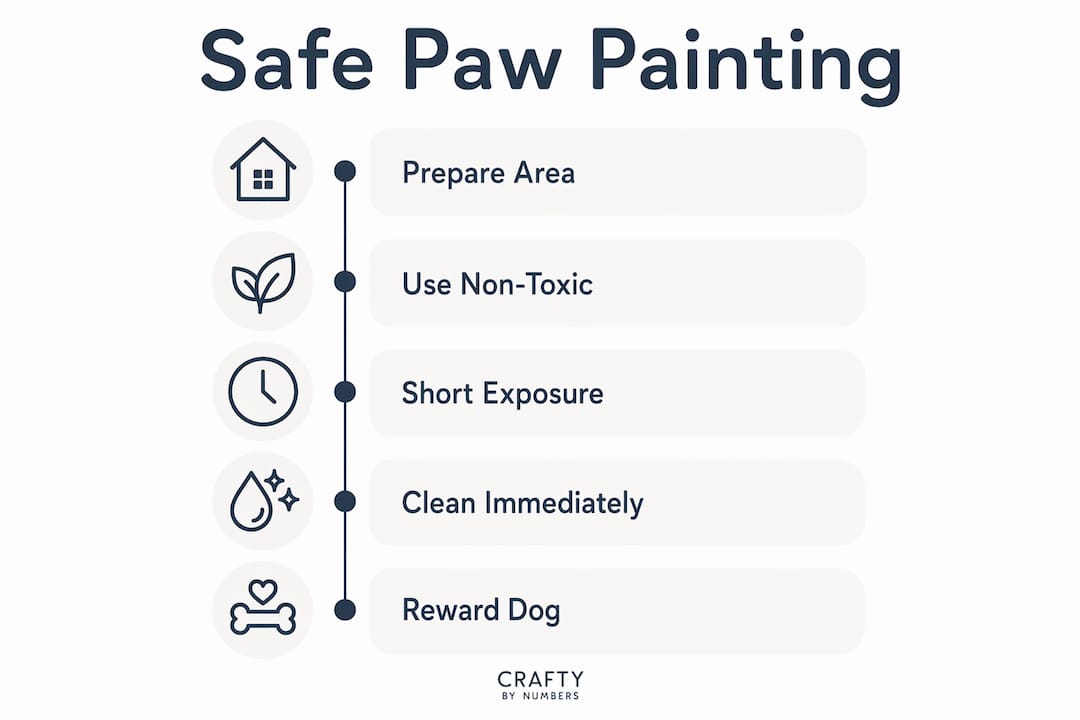
- Lay a drop cloth or old towel under your workspace before you open any paint.
- Trim your dog’s nails a day before the session so the paw pad sits flat against the surface.
- Apply a thin, even coat of pet-safe ink or washable paint to the pad using a foam sponge.
- Hold the paw gently but firmly and press it onto your canvas or card stock for three seconds.
- Lift straight up without dragging.
- Wipe the paw immediately with a damp cloth, then follow with a gentle pet-safe soap rinse.
- Reward your dog right away so the experience stays positive.
The safest paw painting methods prioritize short exposure and immediate paw cleaning. Session setup matters more than the paint brand itself. A dog that stands in wet paint for even two minutes has far more risk of ingestion through grooming than one whose paw is cleaned within thirty seconds.
Pro Tip: Keep the session under five minutes. Dogs lose patience fast, and a rushed or stressed dog will smear every print. Two good prints in four minutes beats ten bad ones in twenty.
Creative uses for finished paw prints include greeting cards, framed canvas art, ornament transfers, and custom tote bags. For a polished display, the stretched canvas guide from Craftybynumbers walks you through mounting your finished piece for wall display.
- Frame a single large print on a 5x7 canvas for a minimalist look.
- Arrange four prints in a grid on a 12x12 canvas for a graphic, modern piece.
- Combine a paw print with a handwritten date and your dog’s name for a keepsake.
- Use multiple colors in sequence to create a rainbow paw series.
What is the step-by-step process to paint realistic dog portraits with acrylics?
Acrylic dog portraits are the most technically demanding approach, but they produce the most display-worthy results. Acrylics are forgiving and fast-drying, which makes them ideal for beginners who need to correct mistakes without waiting overnight. The key is building the painting in layers rather than trying to finish fur texture in one pass.
Follow this sequence for a realistic portrait:
- Gather reference photos. Take three to five photos of your dog in natural light from the same angle. A sharp, well-lit photo is the single biggest factor in a realistic result.
- Sketch the outline. Transfer the basic shape onto your canvas with a light pencil or diluted paint. Focus on the head shape, ear placement, and eye position.
- Map your values. Identify the darkest shadows and brightest highlights before you mix any color. A strong value map prevents the flat, washed-out look that trips up most beginners.
- Apply an underpainting. Block in the whole canvas with a single neutral tone, usually a warm brown or gray. This gives every subsequent layer something to react against and adds depth automatically.
- Build color in layers. Start with mid-tones, then add shadows, then highlights. Layering values and colors progressively adds realistic fur texture that a single-pass approach cannot achieve.
- Paint the eyes and nose first among facial features. These anchor the likeness. If the eyes are wrong, no amount of perfect fur will save the portrait.
- Add fur detail last. Use a fine liner brush or a fan brush to pull individual hair strokes over dried base layers. Work in the direction the fur actually grows.
- Refine edges and add highlights. A small amount of white or a light tint on the nose tip, brow ridge, and eye catchlight brings the whole painting to life.
Pro Tip: Mix your shadow tones with a touch of the complementary color rather than black. A golden retriever’s shadow looks richer with a hint of violet than with straight black paint.
Portrait technique comparison
| Technique | Best for | Skill level |
|---|---|---|
| Underpainting first | Depth and realism | Beginner to intermediate |
| Wet-on-wet blending | Soft fur transitions | Intermediate |
| Dry brush fur strokes | Short-haired breeds | Beginner |
| Glazing with thin layers | Rich color depth | Intermediate to advanced |
| Impasto highlights | Texture and drama | Advanced |
For pet owners who want a structured starting point, beginner art projects from Craftybynumbers offer guided formats that build the same foundational skills used in portrait painting.
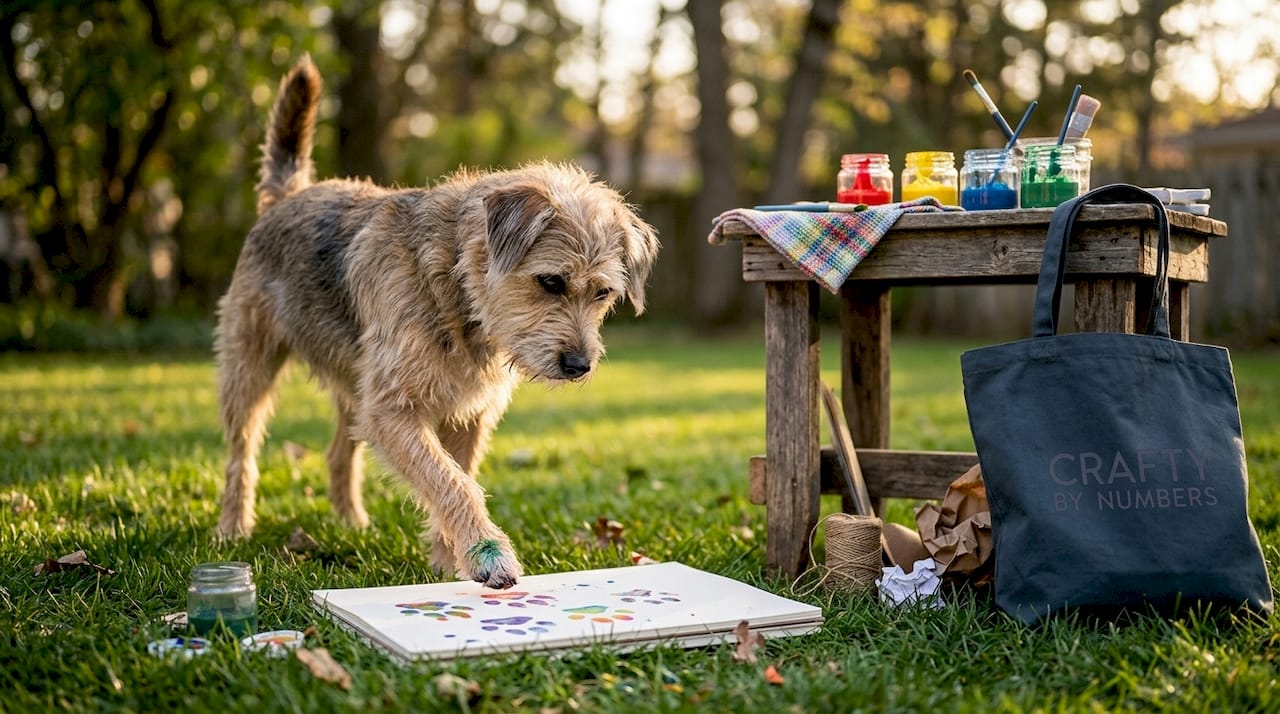
How can dogs participate interactively in creating abstract art?
Dogs can create genuine abstract art by manipulating sealed paint bags placed over poster board. The method, described by artist Emilie Vardaman, uses a gallon-sized zip-lock bag filled with two or three colors of acrylic paint. The bag is sealed and taped flat over a sheet of poster board. A treat, typically peanut butter or a small piece of chicken, is placed under the board to encourage the dog to paw, lick, and nose the surface. The paint inside the bag swirls and blends with every movement.
Materials you need:
- Poster board or thick card stock, at least 11x14 inches
- Gallon-sized zip-lock bags
- Two to three colors of acrylic paint (avoid more than three to prevent muddy blends)
- Peanut butter or a high-value treat
- Tape to secure the bag to the board
- A camera to document the session
Limiting colors in dog-created abstract art avoids muddy results. Three colors maximum keeps the finished piece visually clear. Red, yellow, and white produce warm, energetic swirls. Blue, white, and a touch of black create a cool, moody composition.
The dog never contacts the paint directly, which eliminates ingestion risk entirely. The sealed bag approach is the safest interactive method available. Once the dog loses interest, remove the bag and let the poster board dry flat. The result is a one-of-a-kind piece with your dog’s actual movement recorded in color.
Pro Tip: If your dog ignores the bag, smear a thin line of peanut butter directly on the outside of the plastic. Most dogs will investigate immediately, and that first nose-push creates the best swirl patterns.
For more ideas on turning a painting session into a shared experience, the family painting night guide from Craftybynumbers covers setup, cleanup, and keeping everyone engaged.
Key takeaways
Painting dogs safely and successfully requires matching your method to your materials, your skill level, and your dog’s temperament.
| Point | Details |
|---|---|
| Choose certified paints | Use ACMI AP non-toxic, washable acrylics or pet-safe ink pads for any project involving direct dog contact. |
| Keep sessions short | Limit paw-print sessions to five minutes and clean paws immediately to prevent licking and ingestion. |
| Build portraits in layers | Start with an underpainting and value map before adding fur texture for realistic acrylic results. |
| Seal paint for interactive art | Use zip-lock bags filled with two to three paint colors so dogs can create abstract art without touching wet paint. |
| Composition drives impact | Place the dog’s gaze as the focal point of any portrait to direct viewer attention and maximize emotional impact. |
Why the dog’s gaze changes everything in a painting
Critic Thomas W. Laqueur argues that dogs in paintings direct viewer attention and organize visual space in ways few other subjects can. I have found this to be true in practice. A portrait where the dog looks slightly off-canvas pulls the viewer’s eye out of the frame. A dog that looks directly at the viewer creates an immediate emotional connection that holds attention.
Most pet owners default to realism because they want the painting to look like their specific dog. That instinct is correct, but stylized approaches deserve more credit. The Dogs Playing Poker series, painted between 1894 and 1910, became one of the most recognized bodies of dog art in American history precisely because it abandoned realism in favor of personality. The dogs in those paintings are memorable because of their posture and expression, not their anatomical accuracy.
My honest recommendation is to try both. Paint one realistic portrait from a reference photo, then paint a second version where you exaggerate the ears, simplify the fur, and let color choices go bold. The second version will teach you more about composition and color than the first. It will also be more fun to make.
The safest and most rewarding dog art projects share one quality: they respect the dog’s limits. A stressed dog produces bad paw prints and bad abstract art. A relaxed dog produces better results in every format. Build the session around the dog’s comfort, not your creative ambition, and the work will show it.
— Paula S.
Craftybynumbers kits for your next dog portrait project
Dog portrait painting rewards preparation. Having the right canvas, the right brushes, and pre-mixed acrylic colors removes the biggest barriers for anyone starting out.

Craftybynumbers serves over 120,000 customers with kits that include a pre-printed canvas, high-quality acrylic paints, and detail brushes in every box. The Ivory Essence kit is a strong choice for pet portrait work, with a detailed canvas format and a color palette suited to warm, realistic tones. Each kit comes with clear instructions, so you spend your time painting rather than troubleshooting supplies. For pet owners who want a structured, satisfying creative project, Craftybynumbers kits deliver a finished piece worth displaying.
FAQ
What is the safest paint to use on a dog’s paws?
Pet-safe, washable ink pads with an ACMI AP non-toxic certification are the safest option. If paint is used instead, choose a water-based washable acrylic and clean the paw within thirty seconds of the print transfer.
How do I paint realistic dog fur with acrylics?
Start with an underpainting and a value map, then build fur texture in multiple thin layers using a fine liner or fan brush. Pull strokes in the direction the fur grows and add highlights last.
Can dogs safely participate in making art?
Yes, with the right setup. The sealed paint bag method lets dogs create abstract art without any direct paint contact. For paw prints, brief exposure and immediate cleanup keep the process safe.
What colors work best for a dog portrait?
Warm browns, ochres, and burnt siennas cover most dog coat colors. Mix shadows with a complementary color rather than black to keep the painting from looking flat.
How do I display a finished dog paw-print canvas?
Let the print dry completely, then follow a canvas stretching process to mount it for wall display. A simple frame also works for card stock or paper prints.
0 commentaire