


Stretching a painted canvas onto stretcher bars is the standard method for mounting canvas art into a gallery-ready display. The process involves pulling the canvas taut over a wooden frame, then stapling it securely to the back. Done correctly, it protects your painting, improves its visual impact, and opens up framing options that a rolled or flat canvas simply cannot offer. You will need stretcher bars, canvas pliers, and a staple gun at minimum. Timing matters too. Stretching within about one month of painting significantly reduces the risk of cracking as the paint cures.
What tools and materials do you need to turn painted canvas into a stretched display?
The right tools make the difference between a professional result and a frustrating one. Gather everything before you start. Stopping mid-process to find a missing tool breaks your rhythm and risks uneven tension.
| Tool | Purpose |
|---|---|
| Stretcher bars | Form the wooden frame the canvas wraps around |
| Canvas pliers | Grip and pull canvas taut without tearing |
| Staple gun | Secures canvas to the back of the frame |
| Push pins | Temporarily hold canvas in place before stapling |
| Tape measure | Checks frame squareness and canvas alignment |
| Mallet | Taps stretcher bar joints together firmly |
| Scissors | Trims excess canvas after stapling |
| Stretcher keys | Small wedges that re-tighten canvas over time |
Stretcher bars come in two main types: standard and heavy duty. Standard bars work well for canvases up to about 16 by 20 inches. Heavy duty bars are better for anything larger, since they resist bowing under tension. Kiln-dried pine stretcher bars prevent warping and maintain stable tension over time. Avoid cheap, untreated wood, which can twist and ruin a finished painting within months.
Your stretcher bars must match your canvas size. Measure the painted area carefully, not just the total canvas sheet. The bars should sit just inside the painted edge so the image wraps cleanly around the frame sides.
Pro Tip: Lay your canvas face down on a clean, flat surface before you begin. A piece of foam board or a clean blanket protects the painted surface from scratches during the stretching process.
You can find canvas pliers and staple guns at most craft supply retailers. Do not substitute regular pliers. Canvas pliers have wide, padded jaws that grip the fabric without tearing it.
How to stretch a painted canvas step by step
This is the core process. Follow each step in order. Skipping ahead, especially before squaring the frame, causes problems that are hard to fix later.
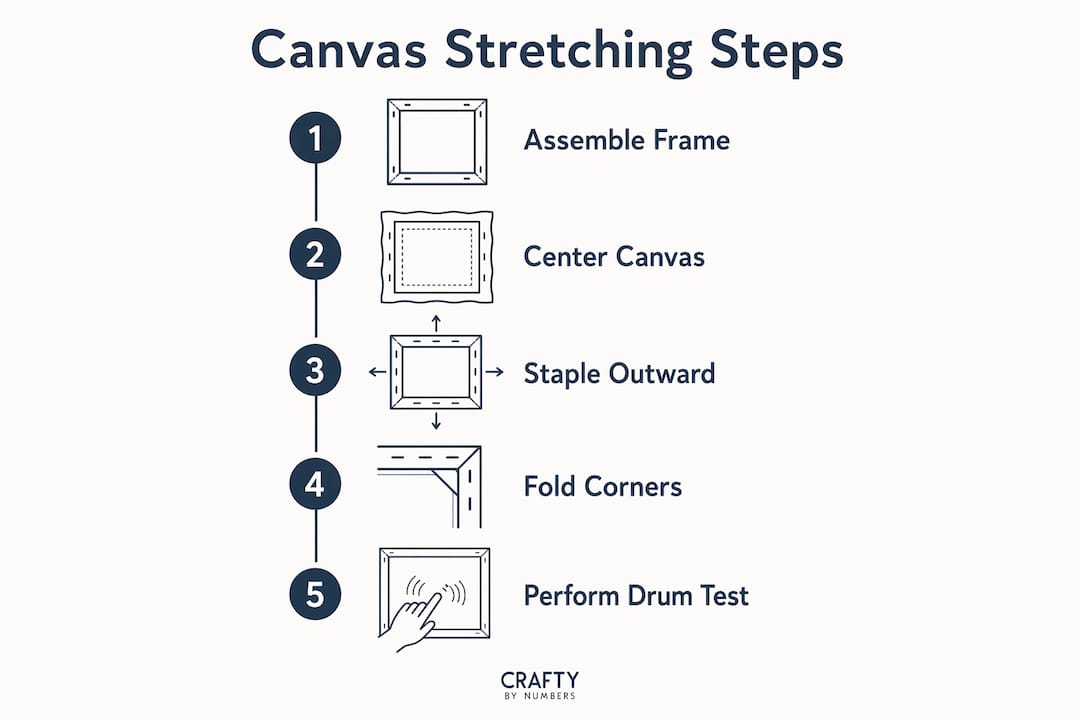
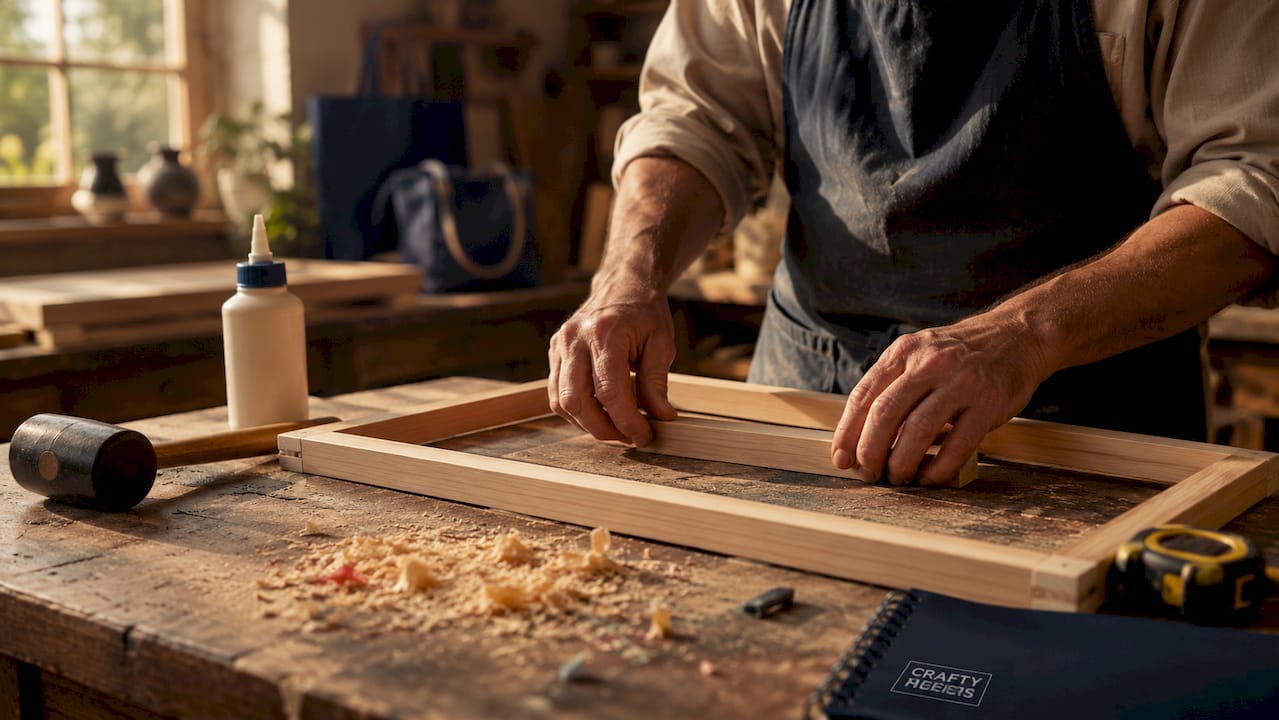
Step 1: Assemble and square the stretcher bars
Fit the four stretcher bar pieces together at the corners. Tap each joint firmly with a mallet until the frame is tight. Then measure both diagonals from corner to corner. Both diagonals must match for the frame to be perfectly square. If they differ, push the longer diagonal corners gently toward each other until the measurements are equal. A square frame is the foundation of a flat, professional result.
Step 2: Center the canvas and pin it temporarily
Place the canvas face down on your work surface. Set the frame on top, centered over the painting. Use push pins to temporarily secure the center point of each of the four sides to the frame. This holds the canvas in position while you check alignment. Step back and confirm the image is centered and straight before you commit to stapling anything.
Step 3: Staple from the center outward
Pull the canvas at the center of one long side with your canvas pliers and drive one staple. Move to the opposite side, pull with equal tension, and staple. Repeat for the two short sides. Always alternate opposite sides. Staple every 2–3 inches along each edge, working outward from the center toward the corners. This alternating pattern distributes tension evenly across the entire canvas. Uneven tension creates waves and bulges that no amount of keying will fix later.
Step 4: Stop about 1 inch from each corner
Leave roughly 1 inch of space near each corner when stapling the sides. This gap gives you room to fold the corners cleanly without bunching the fabric.
Step 5: Fold the corners with the hospital corner technique
The hospital corner fold is the standard method for neat canvas corners. Fold one side of the corner fabric flat against the frame. Then fold the adjacent side over it, creating a clean pleat on the back. The front and sides of the canvas should look smooth with no visible folds. Staple the folded flap securely. A double flap on the back improves corner appearance and keeps the canvas smooth at the edges.
Step 6: Perform the drum test
Tap the center of the stretched canvas lightly with your fingertip. A properly tensioned canvas produces a firm, resonant sound, similar to a drum. A dull thud or visible flex means the canvas is too loose. If tension is uneven, you will hear different sounds in different areas. Address loose spots by re-pulling and re-stapling before moving on.
Pro Tip: If the canvas feels slightly loose after stapling, do not re-staple immediately. Insert the stretcher keys first and give the canvas 24 hours to settle. Re-test with the drum method before making further adjustments.
Common mistakes to avoid during this process include stapling before squaring the frame, pulling one side much harder than the other, and skipping the temporary pin step. Each of these errors creates tension problems that compound as you work toward the corners.
How do you adjust and maintain canvas tension after stretching?
Canvas tension changes over time. Humidity, temperature shifts, and the natural relaxation of fabric fibers all cause a stretched canvas to loosen. Stretcher keys solve this problem without requiring you to re-staple.
Stretcher keys are small wooden or plastic wedges that fit into slots at each corner of the stretcher frame. Most frames include eight keys, two per corner. Tapping them gently into the slots pushes the corner joints slightly apart, expanding the frame perimeter and increasing canvas tension. The expansion is small but effective.
Apply keys carefully. Tap each one a few millimeters at a time, then rotate to the next corner. Never drive one key all the way in before moving to the others. Uneven expansion stresses the canvas unevenly and can cause tears. After each round of tapping, wait at least 24 hours to let the canvas fibers settle before checking tension again.
Signs that your canvas needs adjustment:
- Visible sagging or waviness in the center
- A dull sound when you tap the surface
- Paint cracking along stress lines near the edges
- The canvas visibly pulling away from the frame at any point
For large canvases, stretcher keys alone may not be enough. Cross braces every 18–24 inches prevent the stretcher bars themselves from bowing inward under sustained tension. Without internal bracing, a large canvas can develop a concave warp that makes the painting look distorted on the wall.
| Canvas size | Recommended support |
|---|---|
| Up to 16x20 inches | Standard stretcher bars, no bracing needed |
| 20x24 to 24x36 inches | Heavy duty bars plus one center cross brace |
| Larger than 24x36 inches | Heavy duty bars plus cross braces every 18–24 inches |
Pro Tip: Store stretched canvases in a climate-controlled room away from exterior walls. Humidity fluctuations are the leading cause of canvas sagging and stretcher bar warping over time.
DIY canvas stretching vs. professional services: which is right for you?
The honest answer depends on your budget, your confidence with tools, and how much the painting matters to you.
| Factor | DIY stretching | Professional service |
|---|---|---|
| Cost | Low (tools plus bars) | ~$180 for 8x10, ~$336 for 24x36 |
| Precision | Depends on skill and tools | Consistent, guaranteed results |
| Creative control | Full control over tension and finish | Limited input once handed over |
| Time | 1–2 hours for beginners | Turnaround varies by shop |
| Learning value | High, builds lasting skill | None |
DIY stretching costs a fraction of professional pricing once you own the tools. A basic set of stretcher bars, a staple gun, and canvas pliers runs well under $50 for most standard canvas sizes. That investment pays off across every future project. The beginner art projects community has embraced DIY stretching precisely because the skill transfers to every painting you finish.
Professional stretching makes sense for irreplaceable or very large paintings where a mistake would be costly. Framers who specialize in canvas work use pneumatic staple guns, precision alignment tools, and often offer a guarantee against sagging. If you have a painting with significant sentimental or monetary value, the professional fee is reasonable insurance.
Most hobbyists and paint-by-numbers artists fall squarely in the DIY category. The canvases are manageable sizes, the technique is learnable in one session, and the satisfaction of displaying your own finished work is part of the reward. Check paint by numbers tips for additional guidance on finishing and displaying your completed paintings.
Key takeaways
Stretching a painted canvas requires a square frame, even tension applied from the center outward, and proper corner folding to achieve a flat, gallery-quality result.
| Point | Details |
|---|---|
| Timing matters | Stretch within one month of painting to reduce cracking risk as paint cures. |
| Square the frame first | Check both diagonals before stapling to avoid alignment problems later. |
| Alternate sides when stapling | Work from center to corners, alternating opposite sides for even tension. |
| Use stretcher keys carefully | Tap keys incrementally and wait 24 hours between adjustments to protect canvas fibers. |
| Brace large canvases | Add cross braces every 18–24 inches for canvases larger than 24x36 inches. |
What I have learned from stretching painted canvases at home
The single biggest mistake beginners make is rushing. They assemble the frame, throw the canvas on top, and start stapling before checking whether anything is square or centered. Twenty minutes later, the image is crooked, one side is tighter than the other, and the corners look like crumpled paper bags. Patience at the start saves an hour of frustration at the end.
Investing in a real pair of canvas pliers changed my results immediately. Before that, I was using regular pliers wrapped in tape, which slipped constantly and left uneven tension across the canvas. Canvas pliers grip the full width of the fabric and let you pull with consistent, controlled force. They cost about $10 to $15 and are worth every cent.
The drum test is the one technique most tutorials skip, and it is the most useful check in the whole process. You do not need a perfectly calibrated ear. You just need to notice whether the sound changes from one spot to another. If it does, you have uneven tension, and you should fix it before the paint settles into that shape permanently.
My honest advice for anyone finishing a paint-by-numbers kit from Craftybynumbers: do not roll the canvas up and put it in a drawer. Stretch it. The artwork is genuinely worth displaying, and the stretching process is far less intimidating than it looks. Start with a small canvas, follow the steps in order, and you will have a wall-ready piece within an afternoon.
— Paula S.
Craftybynumbers kits worth stretching and displaying
Craftybynumbers has served over 120,000 customers with detailed, vibrant paint-by-numbers kits designed to produce finished art that looks stunning on a wall. The kits include pre-printed canvases, high-quality acrylic paints, and detail brushes, so the painting experience is smooth from start to finish.
Once your painting is complete, the next step is getting it on the wall where it belongs. The Ivory Essence and Garden of Dreams kits are particularly popular choices for display, thanks to their rich color palettes and detailed compositions that reward the stretching process. Visit Craftybynumbers to browse the full collection and find your next project worth framing.
FAQ
How long after painting can you stretch a canvas?
Stretch a painted canvas within about one month of completing it. Waiting longer increases the risk of cracking as the acrylic or oil paint fully cures and loses flexibility.
What is the drum test for canvas tension?
The drum test involves tapping the center of a stretched canvas lightly with your fingertip. A firm, resonant sound confirms proper tension. A dull thud means the canvas is too loose.
How do stretcher keys work?
Stretcher keys are small wedges inserted into slots at each frame corner. Tapping them in gently pushes the corner joints apart, slightly expanding the frame and tightening the canvas without re-stapling.
Is DIY canvas stretching cheaper than professional services?
DIY stretching costs a fraction of professional pricing. Professional services run approximately $180 for an 8x10 canvas and $336 for a 24x36 canvas, while DIY tools cost well under $50 for most standard sizes.
What causes a stretched canvas to sag over time?
Humidity changes and the natural relaxation of canvas fibers cause sagging. Use stretcher keys to re-tighten the canvas incrementally, and add internal cross braces for canvases larger than 24x36 inches.
0 comments