

A detailed custom paint by numbers kit starts with the photo you upload. Go with a single-subject shot, sharp and well lit, with the long edge around 2400 to 4000 pixels and printed at 200 to 300 DPI. Portraits, pets, and simple landscapes convert the most cleanly.
Photos that convert best share three traits:
- One clear subject, not a crowd or a busy scene
- Even lighting with no harsh shadows or blown-out highlights
- Enough native resolution to survive printing at 12x16 inches or larger
Every custom kit from Craftybynumbers arrives with a pre-printed canvas, matched acrylic paints, and detail brushes, so once your photo is right, the rest of the kit is already sorted.
Key Takeaways
A sharp, single-subject photo at roughly 2400 to 4000 pixels long edge, converted at 200 to 300 DPI with 16 to 36 colors depending on the subject, produces the most paintable, detailed results.
| Point | Details |
|---|---|
| Resolution target | Aim for a long edge of 2400 to 4000 pixels and 200 to 300 DPI at print size. |
| Best subjects | Single-subject portraits, pets, and simple landscapes with even lighting convert most cleanly. |
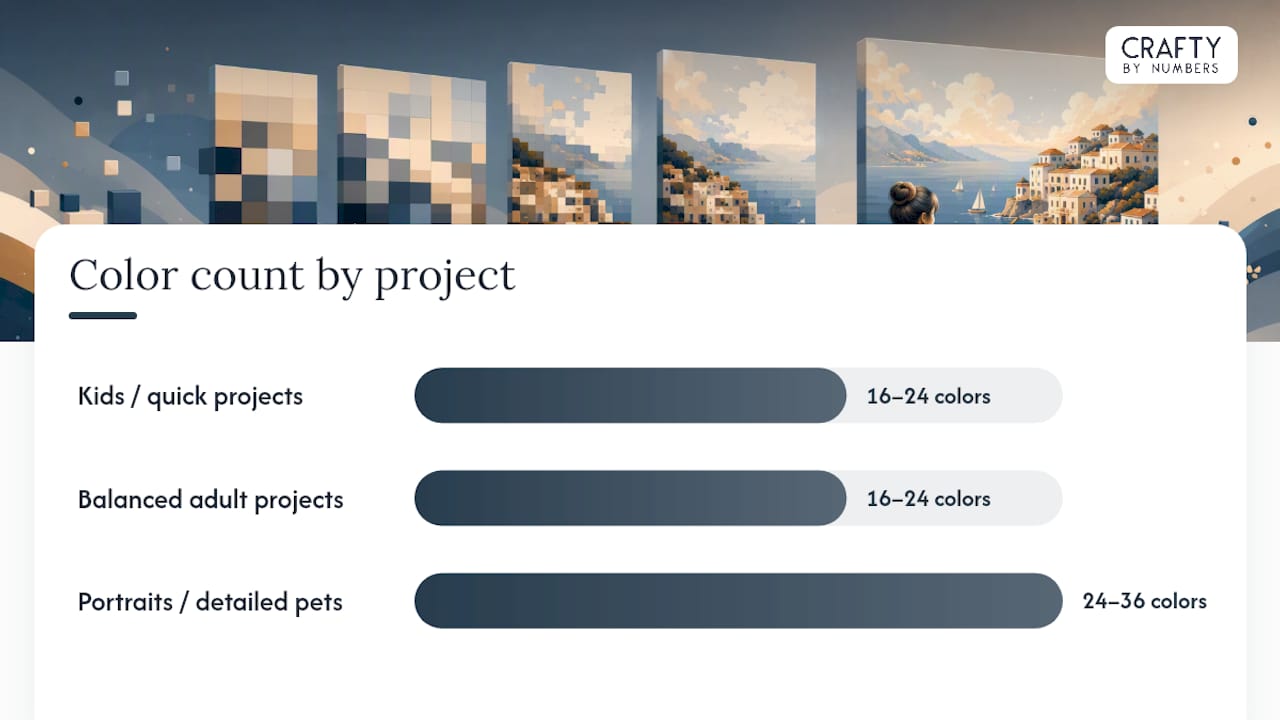
| Color count by project | Use 16 to 24 for kids, 16 to 24 for balanced adult projects, and 24 to 36 for detailed portraits or pet fur. |
| Canvas size matters | Larger canvases (16x20 inches or more) give higher color counts room to stay paintable. |
| Craftybynumbers custom kits | Upload a photo and receive a pre-printed canvas, matched acrylic paints, detail brushes, and a reference guide. |
Table of Contents
- What Resolution Does a Paint by Numbers Photo Need?
- Which Photos Make the Best Custom Templates?
- How Does Color Count Change What You Can Paint?
- How Do You Match Canvas Size to Your Photo?
- How Do You Paint Fine Detail Cleanly?
- What if the Template Looks Off?
- What Actually Matters Once You Get Past the Marketing
- How to Order Your Own Custom Kit
- Sources
- FAQ
What Resolution Does a Paint by Numbers Photo Need?
Pixels and DPI solve two different problems, and confusing them is the most common mistake people make before ordering a custom kit. Pixels are the raw data in your file. DPI (dots per inch) is how densely those pixels get packed onto paper or canvas when printed. A photo with plenty of pixels but printed at a low DPI turns soft and blurry the moment you blow it up to canvas size.
For a crisp result, aim for these targets:
- Long edge pixel count: 2400 to 4000 pixels minimum for anything larger than a small canvas.
- Print resolution: 200 to 300 DPI, with providers commonly recommending the higher end of that range for portraits and pet fur.
- Focus and sharpness: soft or motion-blurred originals lose edge definition, and edges are exactly what becomes a numbered region.
Statistic Callout: Photos below roughly 150 DPI at your target canvas size tend to produce mushy, indistinct regions once converted, particularly around eyes, whiskers, and other fine detail.
Which Photos Make the Best Custom Templates?
Not every favorite photo makes a good template. The photos that convert cleanly almost always share the same handful of qualities, and the ones that fight you at the easel usually broke one of these rules from the start.
- Single subject, filling most of the frame, with head-and-shoulders framing for pets and people
- Even, natural lighting rather than harsh flash or deep shadow
- Minimal background clutter that could compete with the main subject
- No motion blur, heavy grain, or tight group shots with several faces overlapping
Crop before you upload. Pull the subject toward the center, cut out distracting background elements, and check that the file still holds its resolution after cropping since cropping shrinks your usable pixel count. If you’re working from a pet photo, get close enough that the eyes and nose are sharp, since blurry eyes are the single most common complaint with pet portraits.
Pro Tip: A phone photo can absolutely work if it’s sharp and well lit. Crop tight to the subject, bump the contrast slightly, and it can compensate for a smaller native file size.
How Does Color Count Change What You Can Paint?
Color count is the setting that decides whether your finished piece looks photorealistic or graphic, and it directly affects how easy the kit is to paint. More colors means more visual accuracy but also more tiny regions crowded onto the canvas.
| Project Type | Recommended Color Count | Why |
|---|---|---|
| Kids or quick projects | 16 to 24 | Large, simple regions, fast to finish |
| Balanced adult projects | 16 to 24 | Manageable detail without overwhelming regions |
| Portraits and detailed pet fur | 24 to 36 | Captures skin tones and fur texture accurately |
Providers generally cap hand-painted kits well below 40 colors, since anything higher creates regions too small to paint with a brush.
The smoothing or detail slider matters just as much as color count. Turn smoothing up and small slivers merge into larger, paintable shapes. Turn it down and you keep every fine detail, but you also get dozens of tiny regions that test your patience.
For uploads, JPEG and PNG are the safest formats, with HEIC accepted by some providers. Skip heavily compressed files. A high-resolution JPEG straight from a camera or phone, before it’s been resized and re-saved a dozen times, preserves more real detail than a larger file that’s been compressed repeatedly. Once your palette is set, those colors get matched to physical acrylic paints using exact hex values, so what you see on screen is what lands in your paint pots.
How Do You Match Canvas Size to Your Photo?
Canvas size and image resolution need to scale together, or you end up with a beautiful file that prints soft and fuzzy. Bigger canvases handle higher color counts far better because each numbered region has more physical room to hold a brush stroke.
- A3 and similarly sized canvases work well with 2400 to 3000 pixel long-edge images and lower to mid color counts.
- 12x16 inch canvases suit 3000+ pixel images and support the 16 to 24 color range comfortably.
- 16x20 inch and larger canvases are where 24 to 36 color portraits actually have space to breathe.
Statistic Callout: Some generators output long-edge files near 2400 pixels and specifically recommend printing at larger sizes once you go above roughly 24 colors, so the smallest regions stay comfortable to paint.
Below a certain physical size, regions become fiddly no matter how good your brush control is. If you’re printing at home rather than ordering a printed kit, use paper at 200 gsm or heavier, and transfer the design to stretched canvas with a graphite or tracing method. For anything above 20 colors, a professionally printed kit will save you real frustration.
How Do You Paint Fine Detail Cleanly?
Painting tiny numbered regions comes down to the right tools and a bit of sequencing, not raw talent. Start with brush choice: a genuine detail brush, like the ones in the FineLine Brush Collection, holds a point far better than the flat brushes bundled with cheaper kits.
- Paint midtones first, then build toward shadows and highlights last
- Use two thin coats rather than one thick one to avoid muddying adjacent colors
- Let each color dry fully before its neighbor goes on, especially in portrait work
- Keep paints organized by number so you’re never guessing mid stroke
- Work under strong, direct light and steady the canvas on a flat surface or easel
A toothpick dipped in paint works surprisingly well for the smallest highlight dots, like a catchlight in an eye, where even a fine brush feels clumsy. Magnification helps too. A basic desk lamp with a magnifier attachment makes those sub-2mm regions manageable instead of maddening. Techniques like these apply just as well to improving overall painting accuracy across any kit, not just custom photo conversions.
Pro Tip: Paint all regions sharing one number before moving to the next color, even if they’re scattered across the canvas. It cuts down on brush cleaning and keeps your color consistent.
What if the Template Looks Off?
Most problems trace back to one of a few fixable causes.
- Regions too small to paint comfortably: lower the color count, size up the canvas, or ask the provider to increase smoothing.
- Photo resolution too low: crop tighter to the subject, retake the photo in better light, or accept a more graphic, simplified look rather than fighting for photorealism.
- Colors look off once printed: this usually traces back to white balance in the original photo. Adjust it before uploading, or ask the provider for a pre-print color adjustment.
- Persistent issues after printing: contact support directly for a custom rework rather than trying to paint around a flawed template.
Providers intentionally drop extremely thin details, like individual whiskers, unless smoothing is reduced or color count is increased. That’s a deliberate trade-off, not a flaw.
What Actually Matters Once You Get Past the Marketing
Most guides to paint by numbers photo prep obsess over DPI numbers and treat resolution like the whole story. It isn’t. I’ve seen plenty of technically perfect, high-resolution files produce disappointing templates because the photo itself was cluttered or badly lit, and I’ve seen modest phone photos turn into gorgeous portraits because the subject was sharp, centered, and evenly lit.
If you take one thing from this guide, prioritize the photo itself over chasing a pixel number. Resolution sets a ceiling on quality, but composition and lighting decide whether you hit anywhere near it. The conventional advice to “just use the highest resolution photo you have” ignores that a high-res photo of a cluttered, poorly lit scene still converts into a mess of confusing regions.
Color count is the second most underrated lever. Adults chasing photorealism often push color counts too high and end up with a kit that feels more like a chore than a relaxing hobby. The 16 to 24 range keeps most projects genuinely enjoyable, and that enjoyment is the entire point of picking up a brush in the first place.
— Paula S.
How to Order Your Own Custom Kit
Once your photo is sharp, well lit, and cropped the way you want it, ordering a custom kit takes just a few steps. You upload your photo, pick your canvas size and detail level, and every kit arrives with a pre-printed canvas, matched acrylic paints, detail brushes, and a reference guide so you’re painting within days, not guessing at colors from scratch.
If you want inspiration before you upload your own photo, browse finished designs like Ivory Essence, Garden of Dreams, Blossoming Cottage, Artistic Village, Sunflower Burst, Spa Candles, Cherry Blossoms, and Cozy Armchair. They show what’s possible at different color counts and canvas sizes, whether you’re picturing a floral piece, a cozy interior scene, or a detailed portrait of your own.
The full walkthrough of the upload and ordering process covers exactly what happens between your upload and your finished canvas arriving at your door. Upload your photo today and see your custom template take shape before checkout.
Sources
FAQ
What Is the Best Photo Resolution for Paint by Numbers?
Aim for a long edge of roughly 2400 to 4000 pixels and a print resolution of 200 to 300 DPI, which keeps edges crisp once the image becomes numbered regions on canvas.
How Many Colors Should a Custom Portrait Use?
Portraits and detailed pet fur generally look best with 24 to 36 colors, while simpler adult projects hold up fine with 16 to 24.
Can I Use a Phone Photo for a Custom Kit?
Yes, as long as it’s sharp and well lit. Cropping tightly to the subject and boosting contrast slightly can offset a smaller native resolution.
What File Formats Work Best for Uploads?
JPEG and PNG are the safest choices, with HEIC accepted by some providers, and less-compressed, higher-resolution files always convert more cleanly.
What Does a Craftybynumbers Custom Kit Include?
Every custom kit includes a pre-printed canvas, matched acrylic paints, detail brushes, and a reference guide built from your uploaded photo.
0 comments