

The fastest route to a smooth acrylic finish is a sealed panel, fluid acrylic thinned with flow improver instead of water, and three or four thin coats applied with a soft synthetic brush, tipped off while wet. Wet-sand between coats with fine grit, then finish with a thin varnish coat. That combination, surface, paint chemistry, thin layering, and denibbing, solves almost every brushstroke problem hobbyists run into.
TL;DR:
- Thinning acrylics with flow improver or glazing medium instead of water creates a more level, smoother surface compared to heavy-body paints or water-thinned layers.
- Switching from canvas to a sealed panel or Masonite reduces surface texture, especially when paired with fine sanding and multiple primer coats before painting.
- Wet-sanding between coats with fine grit paper and proper tools like soft synthetic brushes or foam rollers greatly enhances surface smoothness.
- Using gloss, satin, or matte varnish affects how imperfections show, with matte offering the most forgiving finish for uneven surfaces.
- Proper brush maintenance, controlled application, and avoiding environmental factors like drafts and direct sunlight are essential to prevent surface issues like bubbling or cracking.
Table of Contents
- What Surface Prep Reduces Brush Strokes and Texture?
- Which Acrylic Paint and Medium Combination Levels Best?
- How Do You Apply Acrylic Paint Without Leaving Brush Marks?
- Does Room Temperature Affect How Smooth Acrylic Dries?
- Can You Sand Acrylic Paint to Make It Smoother?
- What’s the Best Way to Varnish a Smooth Acrylic Piece?
- What Do Experienced Painters Do Differently to Get Smooth Results?
- How Do You Get Smooth Coverage With a Palette Knife?
- How Do You Keep Brushes in Shape for a Smooth Finish?
- Why Does Acrylic Paint Bubble, Lift, or Crack?
- Do Silicone or Anti-Foam Additives Improve an Acrylic Finish?
- A Realistic Practice Benchmark for Smoothing Acrylic
- Supplies That Make Smoothing Easier
- Sources
- FAQ
What Surface Prep Reduces Brush Strokes and Texture?
Canvas has tooth built into its weave, and that texture shows through no matter how carefully you paint. Switching to a wood panel or Masonite hardboard removes that variable almost entirely, since these surfaces are naturally flat and can be sanded smoother than woven fabric ever will be.
Before paint touches the surface, run through this sequence:
- Sand the raw panel with fine grit sandpaper to knock down any rough spots.
- Wipe with a tack cloth to lift dust the sandpaper leaves behind.
- Apply two thin coats of gesso or primer, sanding lightly between each with fine grit sandpaper.
- Wipe again before the first paint layer goes on.
Canvas still works fine for looser, textured styles, but if a glassy finish is the goal, switching to a panel or Masonite removes the biggest obstacle before you even open a paint tube.
Which Acrylic Paint and Medium Combination Levels Best?
Heavy-body acrylic holds a peak like buttercream frosting. Fluid acrylic and high-flow paint, by contrast, are formulated to settle flat, which is exactly what you want for a level surface. If heavy-body is what you already own, you don’t need to buy a new paint line; thinning it correctly gets you most of the way there.
The medium you choose matters more than most beginners realize:
- Flow improver (also sold as flow aid) reduces surface tension so paint spreads evenly with less brushwork.
- Glazing medium thins the paint while keeping color intensity, useful for smooth layered work.
- Retarder slows drying time, giving you more seconds to smooth ripples before the paint sets.
- Gloss medium boosts sheen and helps paint self-level slightly as it dries.
Water seems like the obvious thinner, but it dilutes the acrylic binder that holds pigment together. Push it too far and the paint film weakens, cracks, or dries chalky. Fluid acrylics thinned with proper mediums hold their pigment strength in a way water-thinned paint can’t match. Start with roughly one part medium to four parts paint and adjust from there. Craftybynumbers breaks down exact ratios and medium types in its guide to acrylic mediums.
Pro Tip: Mix your medium into a small test puddle before committing to the whole canvas. Two minutes of testing saves you from thinning an entire palette of paint too far.
How Do You Apply Acrylic Paint Without Leaving Brush Marks?
The tool you paint with matters almost as much as the paint itself. Soft synthetic flats and filberts hold a controlled edge of paint and glide rather than drag, which is the main reason stiff bristle brushes leave visible ridges. Here’s the order that works:
- Load the brush evenly, wipe off excess on the palette edge, and pull one long, unidirectional stroke rather than scrubbing back and forth.
- Immediately after laying the coat, sweep a barely-damp brush lightly over the surface. This tip-off pass knocks down ridges before the paint sets and is one of the single most effective smoothing habits a hobbyist can build. Damp-brush smoothing on wet paint is standard practice among painters chasing a brushstroke-free look.
- For flat panels or furniture, switch to a foam or velour roller, then back-roll (a light pass with an empty roller) to flatten the stipple a roller naturally leaves.
- On larger surfaces, an HVLP sprayer thinned to a light cream consistency, sprayed 8 to 10 inches away in slow overlapping passes, produces the flattest finish of any method, though it takes practice to avoid drips.
Small hobby pieces rarely need anything beyond a good brush and a roller. Save the sprayer for furniture, large panels, or multi-piece projects where hand-brushing every inch just isn’t practical.
Pro Tip: Keep a second brush dampened in a water cup specifically for tip-off passes, separate from the brush you’re loading paint with. It stays cleaner and gives you a more controlled, lighter touch.
Does Room Temperature Affect How Smooth Acrylic Dries?
Acrylic paint needs time to settle flat before it sets, and a draft or direct sun cuts that window down to almost nothing. Fast drying, often called flash-drying, locks every brush mark in place before gravity and surface tension get a chance to even things out.
A few adjustments fix most of this:
- Keep your workspace away from open windows, fans on high, or direct sunlight hitting the canvas.
- Add retarder or glazing medium to your mix on hot or dry days to buy extra open time.
- Wipe down your staging area before starting; dust that lands in wet paint creates permanent texture nibs.
- A stable, moderate room, not too hot, not too breezy, gives paint the best shot at self-leveling naturally before it sets.
Craftybynumbers covers how these conditions affect timing in more depth in its guide to acrylic drying time.
Can You Sand Acrylic Paint to Make It Smoother?
Yes, and wet-sanding between coats is one of the most reliable ways to erase texture that brushing alone can’t fix. Once a coat is fully cured, not just dry to the touch, work through a grit ladder rather than jumping straight to the finest paper.
- Start at 400 grit to knock down any raised ridges or dust nibs.
- Move to 600, then 800 grit, sanding in light, even passes with water or a few drops of dish soap as lubricant.
- Finish at 1200 grit or higher if you’re chasing a glass-smooth surface before varnish.
Wet-sanding with a lubricant prevents the sandpaper from gouging the paint film, which dry-sanding tends to do. Hold the panel under a raking light (a lamp angled low across the surface) to spot leftover ridges you’d otherwise miss under normal lighting. If the light reveals more bumps than expected, one more thin coat plus another light sanding pass solves it before you move to varnish.
What’s the Best Way to Varnish a Smooth Acrylic Piece?
Varnish choice changes how visible any remaining texture actually looks. Gloss varnish reflects light directly back at the viewer, which means it shows every tiny imperfection. Satin softens that reflection, and matte diffuses it almost completely, making it the most forgiving option if your leveling wasn’t flawless.
- Apply varnish in thin coats rather than one heavy pour, which tends to pool and create its own texture.
- Spray varnish gives the most even result on flat panels; brush-on varnish works fine for smaller pieces if you use a soft brush and don’t overwork it.
- Let the piece cure fully, often 24 hours, before handling or stacking anything on top.
- Down the road, dust gently with a soft cloth and avoid abrasive cleaners that dull the sheen.
Craftybynumbers walks through the tradeoffs between gloss and matte varnish, including cure times, in its varnish guide for hobbyists.
What Do Experienced Painters Do Differently to Get Smooth Results?
Beginners tend to over-sand, over-thin, or rush straight to varnish before the surface is actually flat. The fixes that make the biggest difference for hobbyists: start on a sealed panel instead of raw canvas, thin with flow improver instead of water, and never skip the tip-off pass right after laying a coat.
Progressive, gentle sanding paired with tested medium ratios avoids the two most common failures: telegraphed scratches and a paint film weakened by too much water. Some brushes are designed with soft synthetic bristles suitable for loading and tip-off passes, paired with acrylics designed to thin cleanly without breaking down.
How Do You Get Smooth Coverage With a Palette Knife?
A palette knife lays down paint in a completely different way than a brush, and for certain effects it actually smooths better. Instead of bristles dragging across the surface, a knife’s flat edge presses paint flush against the panel, similar to spreading frosting with an offset spatula. That pressure eliminates the ridges a brush leaves behind, especially on flat backgrounds or large solid-color areas.
Load a small amount of paint onto the flat side of the knife, then pull it across the surface at a low angle, letting the metal edge, not the paint itself, do the leveling work. Too much paint on the knife causes buildup at the edges; too little skips and streaks. A thin, even layer scraped in one direction, then lightly cross-scraped at 90 degrees if needed, gives the flattest result.
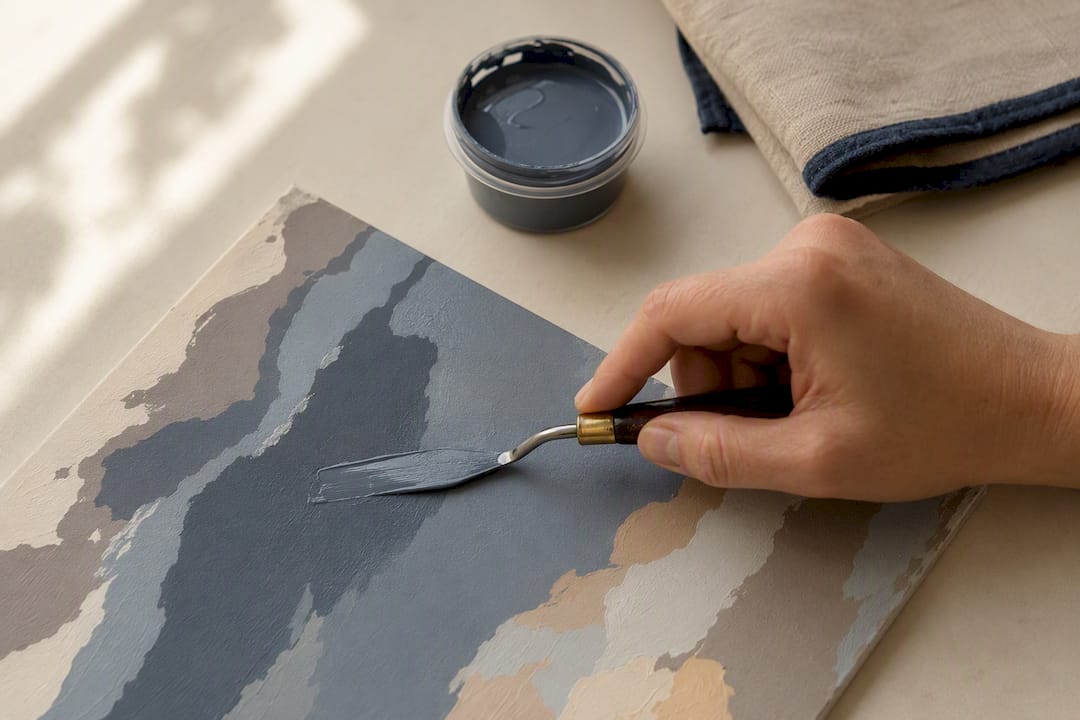
Rubber silicone shapers and old credit cards work as budget substitutes for a true painting knife, and both are worth keeping in a supply drawer for backgrounds and skies where brush texture would otherwise show. Foam applicators are another alternative. They spread paint in a thin, consistent film and clean up faster than bristle brushes, though they hold less paint per pass so you’ll load them more often.
None of these tools replace a good brush entirely. Detail work, edges, and blending still call for bristles. But for flat backgrounds, borders, or any area where you want zero visible texture, a knife or foam applicator often outperforms even a well-loaded brush. Craftybynumbers’ guide on blending acrylics without mud covers how to combine knife work with brush blending on the same piece.
How Do You Keep Brushes in Shape for a Smooth Finish?
A brush loaded with dried paint at the ferrule (the metal band holding the bristles) will never lay down a clean stroke again, no matter how good your technique is. Splayed or crusted bristles drag and skip, adding texture exactly where you’re trying to remove it.
Rinse brushes in lukewarm water immediately after each session, never after paint has had time to dry. Work a small amount of mild soap into the bristles near the ferrule, where pigment likes to hide, then rinse until the water runs clear. Reshape the bristles with your fingers while damp and lay the brush flat to dry rather than standing it bristle-side down in a cup, which lets water seep into the ferrule and loosen the glue over time.
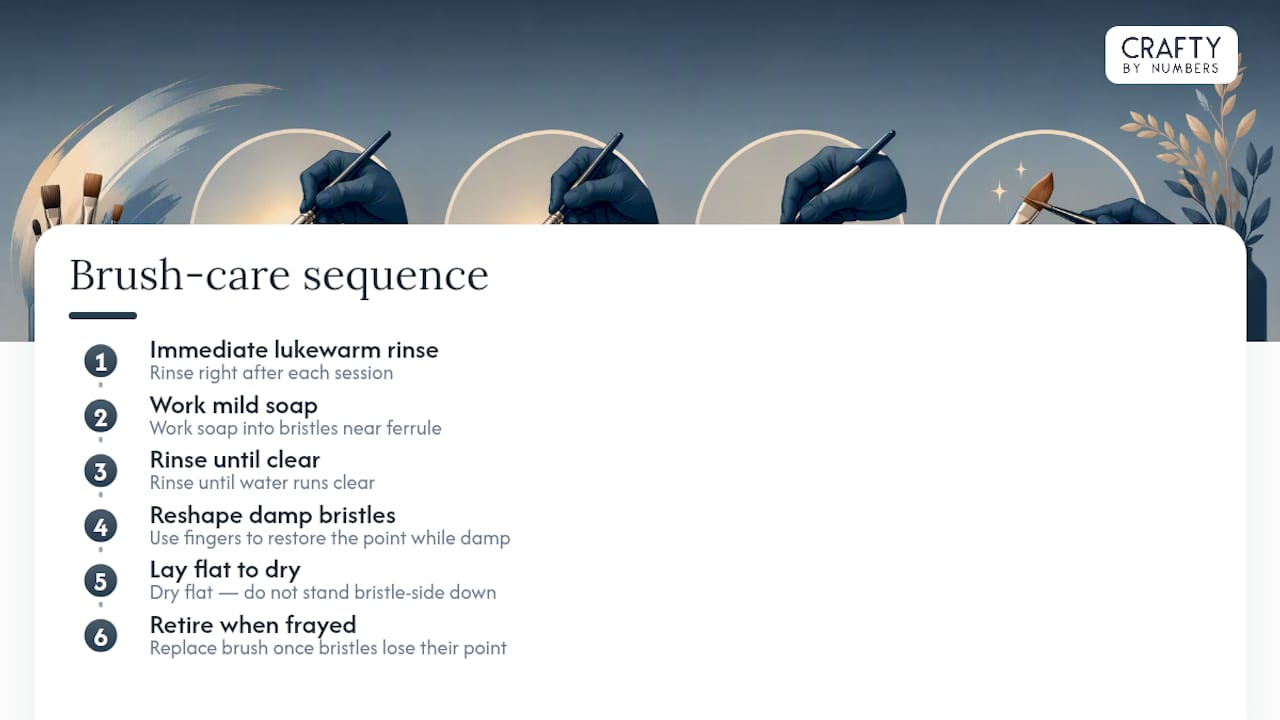
Retire any brush once the bristles fray or lose their point. A splayed brush tip physically can’t produce the long, controlled stroke that a smooth finish depends on, and no amount of soaking brings that shape back. Craftybynumbers’ five-step brush cleaning routine covers the exact rinse, soap, and storage sequence that keeps synthetic bristles performing like new for dozens of sessions. Buying one quality brush and maintaining it well beats cycling through cheap ones that degrade after a handful of uses.
Why Does Acrylic Paint Bubble, Lift, or Crack?
Bubbling almost always traces back to overworking wet paint or applying it too thick in one pass. Air gets trapped under the surface as the paint skins over faster than it can release trapped moisture. The fix is simple: thin coats, applied without excessive back-and-forth brushing, and a little patience between layers.
Lifting happens when a new coat reactivates the layer underneath it, usually because that layer wasn’t fully cured or because too much water was used as a thinner, weakening the bond between layers. Letting each coat cure fully, not just dry to the touch, and sticking to medium-thinned paint rather than water-heavy mixes prevents most lifting problems before they start.
Cracking is a binder problem. It shows up when paint is thinned too aggressively with water, stretched over a flexible surface that moves (like canvas that flexes with humidity), or applied so thick that the surface dries before the interior does. Sticking to a rigid panel, moderate paint thickness, and medium-based thinning rather than water solves nearly every cracking case a hobbyist runs into.
If any of these show up mid-project, don’t panic and don’t sand aggressively to fix it right away. Let the piece cure fully first, then assess with raking light whether a light sand and one corrective coat solves it, or whether the section needs a full redo.
Do Silicone or Anti-Foam Additives Improve an Acrylic Finish?
Silicone and anti-foam additives are common in commercial and architectural acrylic coatings, where they control surface tension and prevent bubbling across large painted areas. They’re built into industrial and exterior acrylic finishes, not artist-grade paint formulas, and mixing a household or hardware-store additive into fine art acrylic risks the opposite of a smooth result: fisheyeing, poor adhesion, or a surface that never fully cures.
Artist acrylics are formulated to level well on their own when paired with the right medium and thinning ratio, which is why flow improver and glazing medium do the job that additives handle in commercial coatings. Architectural acrylic finish products are engineered for exterior building systems with aggregates and binders that have nothing in common with the acrylics on your palette. Skip the additive aisle and lean on flow improver, patience between coats, and proper thinning instead. It’s a more reliable path to smooth results without the risk of ruining a piece.
A Realistic Practice Benchmark for Smoothing Acrylic
Smoothing acrylic is a hand skill, and hand skills improve fast once you’re repeating the right motion instead of guessing. A useful first benchmark: paint a 12 by 12 inch panel with three thin coats, wet-sanding lightly between each one. Most beginners see a visible jump in surface quality by the second panel, long before they’d expect it.
— Paula S.
Supplies That Make Smoothing Easier
If you’re ready to put these techniques into practice, the tools matter as much as the technique. Craftybynumbers’ Professional Brushes are built with the soft synthetic bristles that make tip-off passes and long unidirectional strokes actually work, rather than fighting a stiff brush that drags and skips.
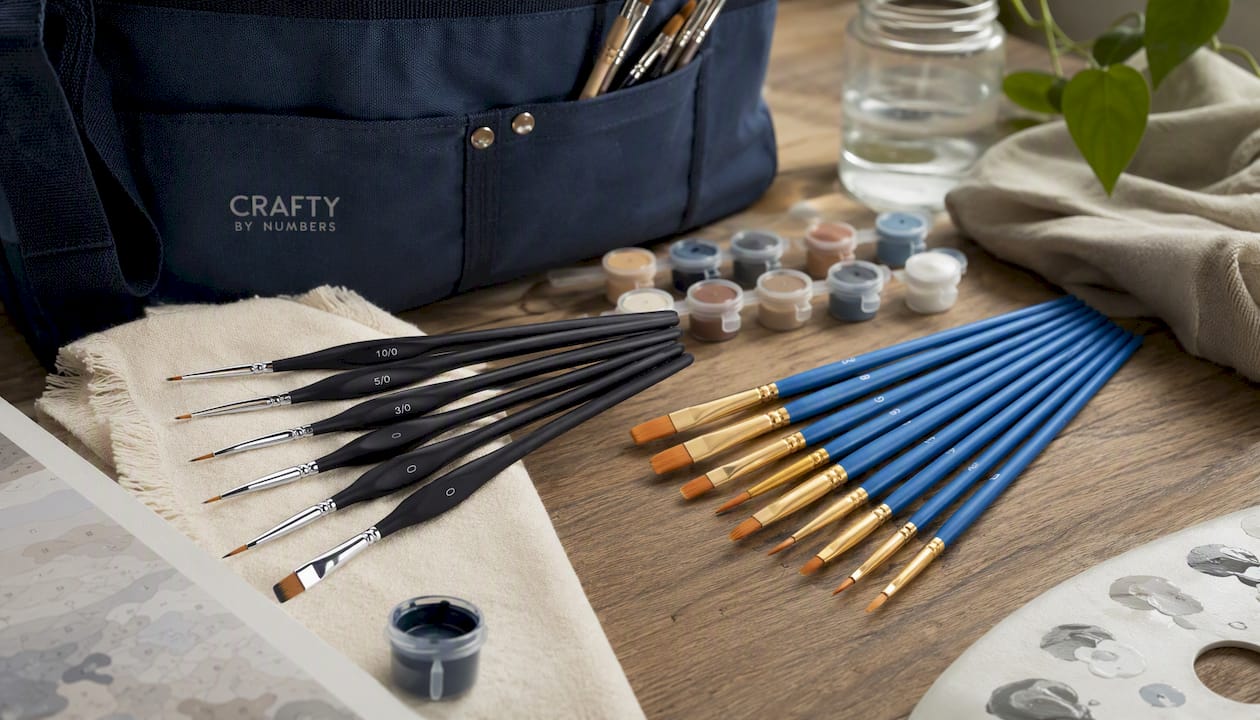
For anyone building out a full kit, the Premium Paint Brushes (Set of 10) covers every size from fine detail work to broad backgrounds, so you’re never reaching for the wrong tool mid-project. New customers can also check current offers on Professional Brushes with a free gift included. If you want a low-pressure project to practice thin coats and wet-sanding on, a kit from the Paint by Numbers collection gives you a pre-matched palette and numbered canvas so you’re focused entirely on technique, not guesswork. Want something personal to practice on? Order a Custom Paint by Numbers Kit built from your own photo, and if anything about the kit or brushes doesn’t work for you, Craftybynumbers’ support team handles returns directly through the site.
Sources
- How to Thin Acrylic Paint — Milan Art Institute blog
- Surfaces for Acrylic Painting — Birch & Button
- Wet-sanding acrylics for best results — Golden Artist Colors / JustPaint
- How to achieve a smooth, brushstroke-free finish with acrylic paint — Brighter Craft
FAQ
How Do You Get a Smooth Finish With Acrylic Paint?
Paint on a sealed panel or well-primed canvas, thin fluid acrylic with a medium like flow improver instead of water, and apply several thin coats with a soft synthetic brush. Tip off each wet coat with a damp brush, then wet-sand lightly between layers before varnishing.
What Type of Acrylic Paint Gives the Smoothest Finish?
Fluid acrylics and high-flow paints level far better than heavy-body formulas because they’re designed with lower viscosity from the start. If you already own heavy-body paint, thinning it with flow improver or glazing medium gets you close to the same result without buying a new paint line.
Can You Sand Acrylic Paint to Make It Smoother?
Yes. Once a coat is fully cured, wet-sanding with fine grit sandpaper and a soapy water lubricant removes dust nibs and ridges without scratching the surface. Work through a grit ladder from 400 up to 1200 or higher for a glass-smooth result before varnishing.
What Do You Add to Acrylic Paint to Make It Smoother?
Flow improver reduces surface tension so paint spreads more evenly with less visible brushwork, while glazing medium thins paint without diluting its color strength. Avoid relying on water as your main thinner since it weakens the paint’s binder and can lead to cracking or a chalky surface.
Are Craftybynumbers Kits Good for Practicing Smoothing Techniques?
Yes. Kits from the Paint by Numbers collection come with matched acrylics and a numbered canvas, which lets you focus entirely on thin-coat and tip-off technique rather than color mixing or composition decisions.
0 comments